User account configuration: manage sessions, automatic account deletion, device limits, and account locks
Clients have the ability to configure many of their user account settings in the CSR Admin. You can access them by selecting Settings from the top navigation bar and User Account Configuration from the left navigation bar.
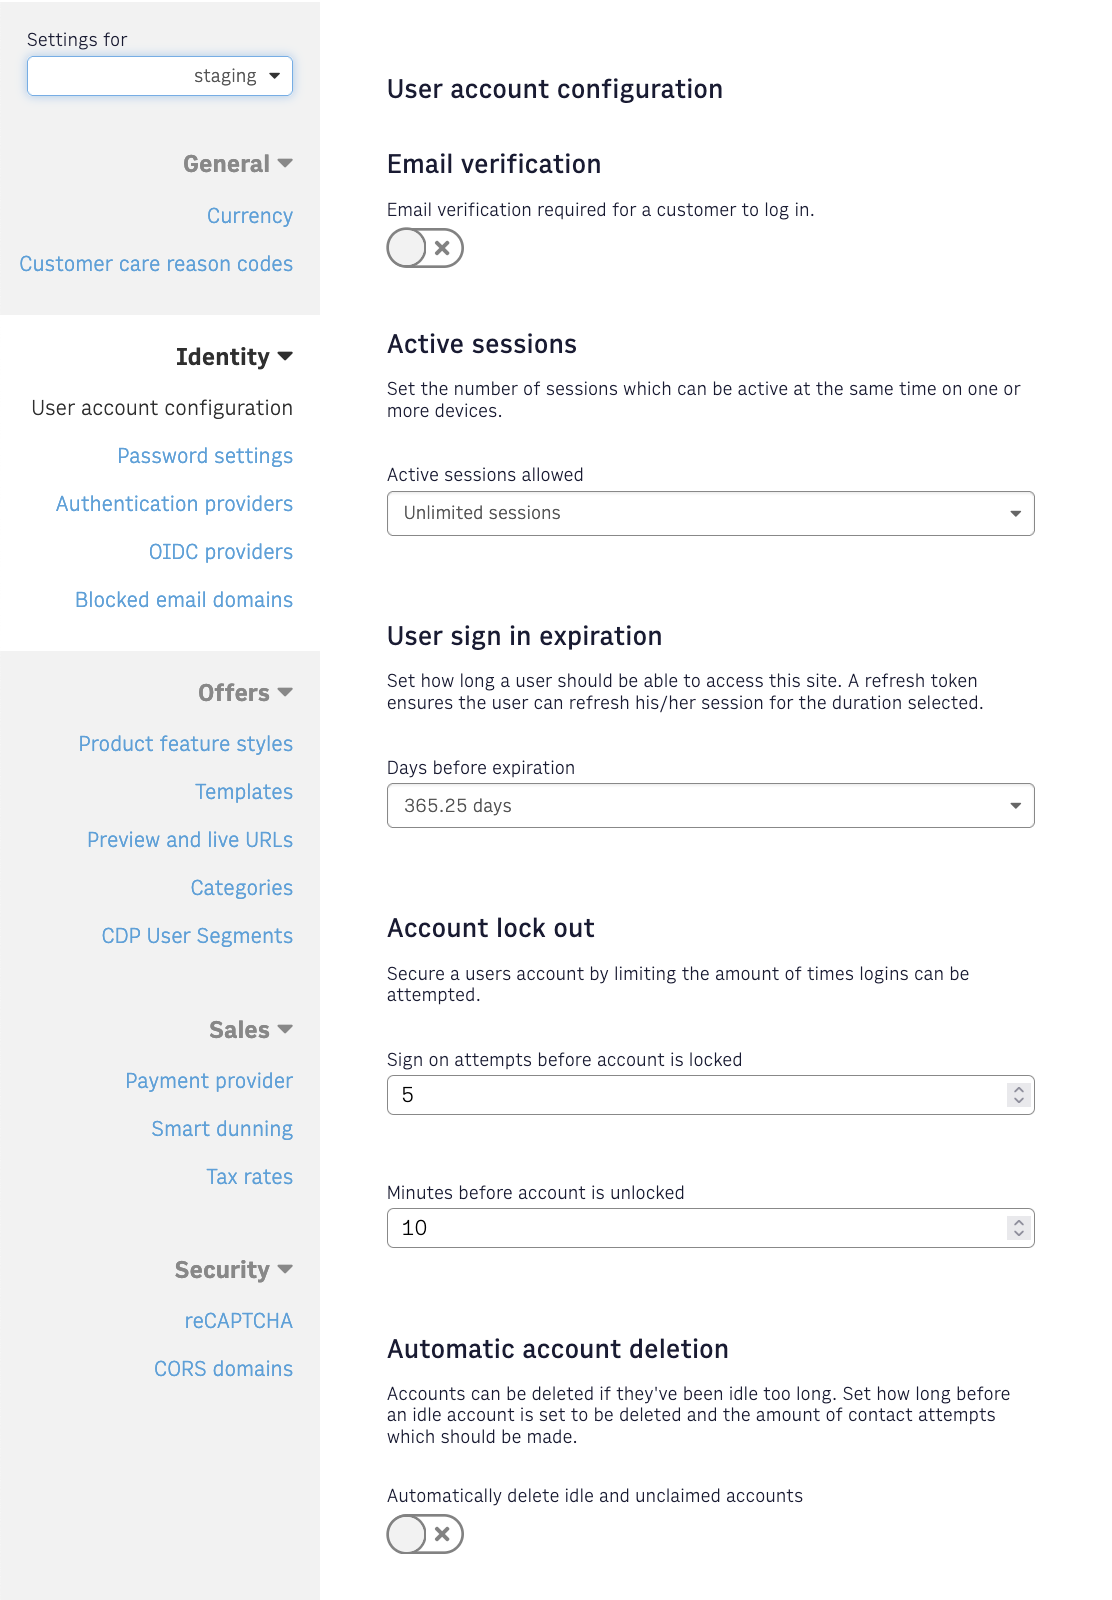
Email verification
You can enable email verification of user accounts by toggling the Email Verification setting.
When a user account has been created, if the user account was created using password verification (not social sign in provider like Google, Facebook, Apple, or third-party auth via OIDC) and the email verification flag is set to ON, then the system requires their email is verified before they are allowed to login. If Email Verification setting is ON and the user has not verified their email, then the user will be unable to login.
When verify email is enabled, a WebSocket event will be generated for VERIFY_EMAIL. You have the option of sending the email when you handle the WebSocket event or you can create an IFX integration that will send the email. Arc XP subscriptions will not send the email.
Email verification can be handled from CSR perspective and/or reader experience, please see Manage user accounts: CSR perspective and Manage user accounts: Reader experience for additional details. Once user’s email is flagged as verified, they will be able to access their account.
Active sessions
To limit credential sharing, you can configure the number of active sessions for your customers’ accounts. For example, when a customer is logged into many devices or shares their account with others, they might reach the limit of possible active sessions. When this occurs, the system generates the Limit is Reached error message. You can then use this error to communicate upgrade options for Friends and Family packages to your customers.
Setting the limit of active sessions
You can configure an account’s number of active sessions on the User Account Configuration page, in the Active Sessions section. The next time the token refresh occurs, the system invalidates older sessions on a first-in, first-out basis.
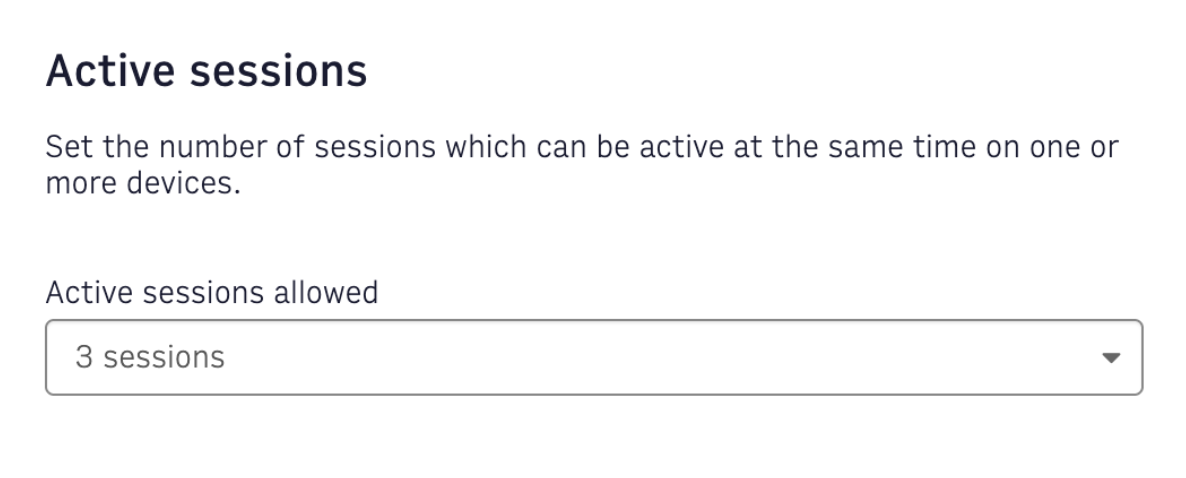
Figure 1. A drop-down menu to configure active sessions
First-in first-out logic
See the following example of the first-in, first-out logic. Say, a user’s current maximum session limit is three devices. Then, the following happens:
- The user logs into three devices in the following order:
a. Their home desktop
b. Their phone
c. Their tablet - When they log in with their work desktop, they receive an error message when the subsequent token refreshes on their home desktop.
- If the user then logs back in on their home desktop, the next device — their phone — receives an error message during the next token refresh. This happens because only three devices can have sessions simultaneously.
Limitations
The following is the list of active sessions limitations:
- Session limit is token ID-based. The system does not consider the customer’s IP or device type.
- The system does not distinguish between the following:
- Same device login after a customer clears session cookies or storage.
- New device login.
- Users who continue to authenticate on each new device or clear storage get error messages.
Error message flow
The following is the active sessions error flow:
- The SDK or the customer’s frontend automatically attempts the oldest login session on one of the customer’s devices.
- The account reaches the maximum number of devices logged in.
- The POST
/identity/public/v1/auth/login(or/identity/public/v1/auth/token) endpoint returns the error code100013. - The customer sees the Limit is Reached message.
User sign-in expiration
The amount of time that users can remain logged in via a persistent session without having to resubmit their login credentials is also configurable. There are two types of session tokens that Arc uses for access control. This way you can have strongly-authenticated sessions which expire fast, and weaker-authenticated re-creatable sessions.
The refresh token is configurable and is created when users first log in and then invalidated when the TTL expires. You can configure the amount of time the refresh token is valid by updating the value in the User Sign In Expiration drop down. Changes to the User Sign In Expiration setting apply to users that log in after the update has been made and prior created tokens will be updated at TTL expiration.
| Session Tokens | Time To Live | Description & Use |
|---|---|---|
| Access Token | 15 Minutes | Refresh takes place in the background so customers can stay logged in based on a valid refresh token |
| Refresh Token | Configurable Default: 365 days | Controls the frequency that customers must re-login and provides a remember-me experience for the reader. If not using the SDK: When the access token expires call POST /identity/public/v1/auth/token to request the new access token |
access-token and refresh-token are returned during Sign up and/or login.
Revoking user sessions
Active user sessions need to be revoked when there is an attack on user accounts, a password is changed or an account is removed. This will require the user to login with their current or new password and ensures that bad actors cannot gain control of accounts.
We offer multiple methods for revoking session tokens.
- In the Customer Service Admin application there is a button in the Account Access tab to revoke all user session tokens.
- A Developer API Is available to complete a bulk session revocation on all accounts that may have been compromised.
Account lock out
In order to keep user accounts safe, you can configure the number of times failed logins are attempted before the account is locked out. A locked out user is blocked from logging in for a set period of time.
You can configure the amount of failed login attempts by changing the value in the Account Lock Out drop down. You can also set the time a user must wait before they are able to log in again.
If the account is locked, a CSR can manually unlock it without needing to wait for the automatic unlocking process.
Account deletion
There are multiple ways to request and delete a user account. Deletion requests can be initiated by users directly, through a customer service support request, or via developer server-to-server APIs that integrate with external automated systems. Rules can also be configured to automatically delete accounts that have never been used or that have been inactive for a defined period of time.
For all deletion methods, you must confirm that no active subscriptions exist and that all required financial and tax-related data is anonymized. If a user has an active subscription, they must contact customer support to cancel the subscription before the account can be deleted.
The account deletion process consists of two stages: a request to delete the account, followed by approval or rejection of that request. While the overall flow is similar across all methods, there are some key differences depending on how the request is initiated.
User-requested deletion
You can create workflows that allow users to directly request account deletion while logged in to their account. Users must be authenticated at the time the deletion request is submitted.
When a user submits a deletion request, an event is generated that can be used to trigger an email through your email service provider. This email needs to include the confirmation code and a link to your site where the user can enter the code to finalize the account deletion.
The user-facing forms used to submit the deletion request, and to enter the confirmation code, are business-specific and must be developed by each organization.
Customer Service Requested Deletion
A customer support representative can initiate an account deletion request on behalf of a user from the Account Management tab in the user’s profile.
After the request is created, it can be approved in one of two ways:
- A customer support manager manually approves the request from the Requests tab.
- The user approves the request by responding to a communication that includes a confirmation code.
As with user-requested deletion, the request generates an event that can be integrated with your email service provider. An email can be sent to the user containing a link to your site where the confirmation code is entered to finalize the deletion. The confirmation form is business-specific and must be implemented by each organization.
Developer Server-to-Server Deletion
Server-to-server APIs are available to integrate account deletion requests with external systems. This method automates both the request and approval steps, so no additional confirmation code or user interaction is required to complete the deletion.
When a deletion request originates from an automated system, approval is granted automatically. An event is then sent that can be used to notify the user that their account has been deleted.
This workflow must be implemented by clients based on the external systems they want to integrate.
:::Note After the deletion is requested, a Pending Approval status appears in the user profile overview. Once the deletion has been approved and completed, the system removes the account and anonymizes all financial records. **This is a permanent action and cannot be undone. :::
Automatic account deletion
It is not always valuable to keep accounts that have never been accessed, and, in some cases, it is required to remove accounts that have been inactive for a significant amount of time. You can automate the removal of inactive accounts, and you can configure the timing and number of messages in the Settings admin. This can be enabled by toggling the flag beneath the Automatic account deletion section.
The configuration options appear after you turn this option on. Then you can set the number of days and contact message attempts.

Deletion timing can be configured separately for idle accounts and ones that are unused. Idle accounts include ones where the user has not logged in for the set number of days but had previously been active. Unused accounts have never had a log in or the email was never verified.
For all deletion options, you can check to confirm that no active subscriptions exist and all critical financial and tax information is anonymized. Remember, these are permanent actions and cannot be undone.
Deleting idle accounts
For idle accounts, a number of contact attempts can be set to message the user and ensure the account should be removed. The contact attempts are sent by Arc as WebSocket events ACCOUNT_DELETION_NOTIFICATION with the account owner information and details of the impending deletion. The events can be used to create notifications informing the user that the account will be deleted if no login or action is completed.
Once this feature is enabled any account whose last logged in is higher than X days (‘X’ corresponds to “days of idle time” ) will start to be notified. Unused accounts have never had a log in or the email was never verified will start to be notified if these accounts have been created for more than Y days (Y corresponds to “days before deleting unused account”).
For idle accounts, “Days of idle time” is basically the time from which the notifications will start going out notifying the account will be deleted. Thus, once the end-user has received the first notification, the account will be deleted in the next “contact attempts” * (7-weekly or 30-monthly) days. The user will receive as many notifications CSR had defined in “contact attempts”.
Deleting unused accounts
For unused accounts, accounts that have never had a log in or the email was never verified, once they receive the first notification, if the user doesn’t take any action, the account will be deleted in the next 7 days.
Unused accounts do not have notification settings and will be deleted after the set time.