Planning Your Micro Experience Migration
Migrating part of your existing experience to a new Micro Experience (MX) requires careful planning. This guide will walk you through the steps necessary to ensure a smooth transition, minimizing disruptions and optimizing your workflow.
There are 3 components, your migration actions will be grouped in.
- MX Router is where your top level routing will happen when a URL is requested for render. MX Router is where your planning begins and at the same time, updating MX configuration that will change MX Router’s behavior, is the last step you should do.
- PageBuilder (Editor) is where your pages, templates and resolvers live. It contains your curation and lower level routing configuration.
- Bundle Code is the foundation, your building blocks your developer team builds for curation. Since it’s such foundational component, it’s the deepest level of planning you will get to, and it should not be your starting point when planning for migrating part of your existing experience to multiple micro experiences.
Here is the high level map of your migration journey:
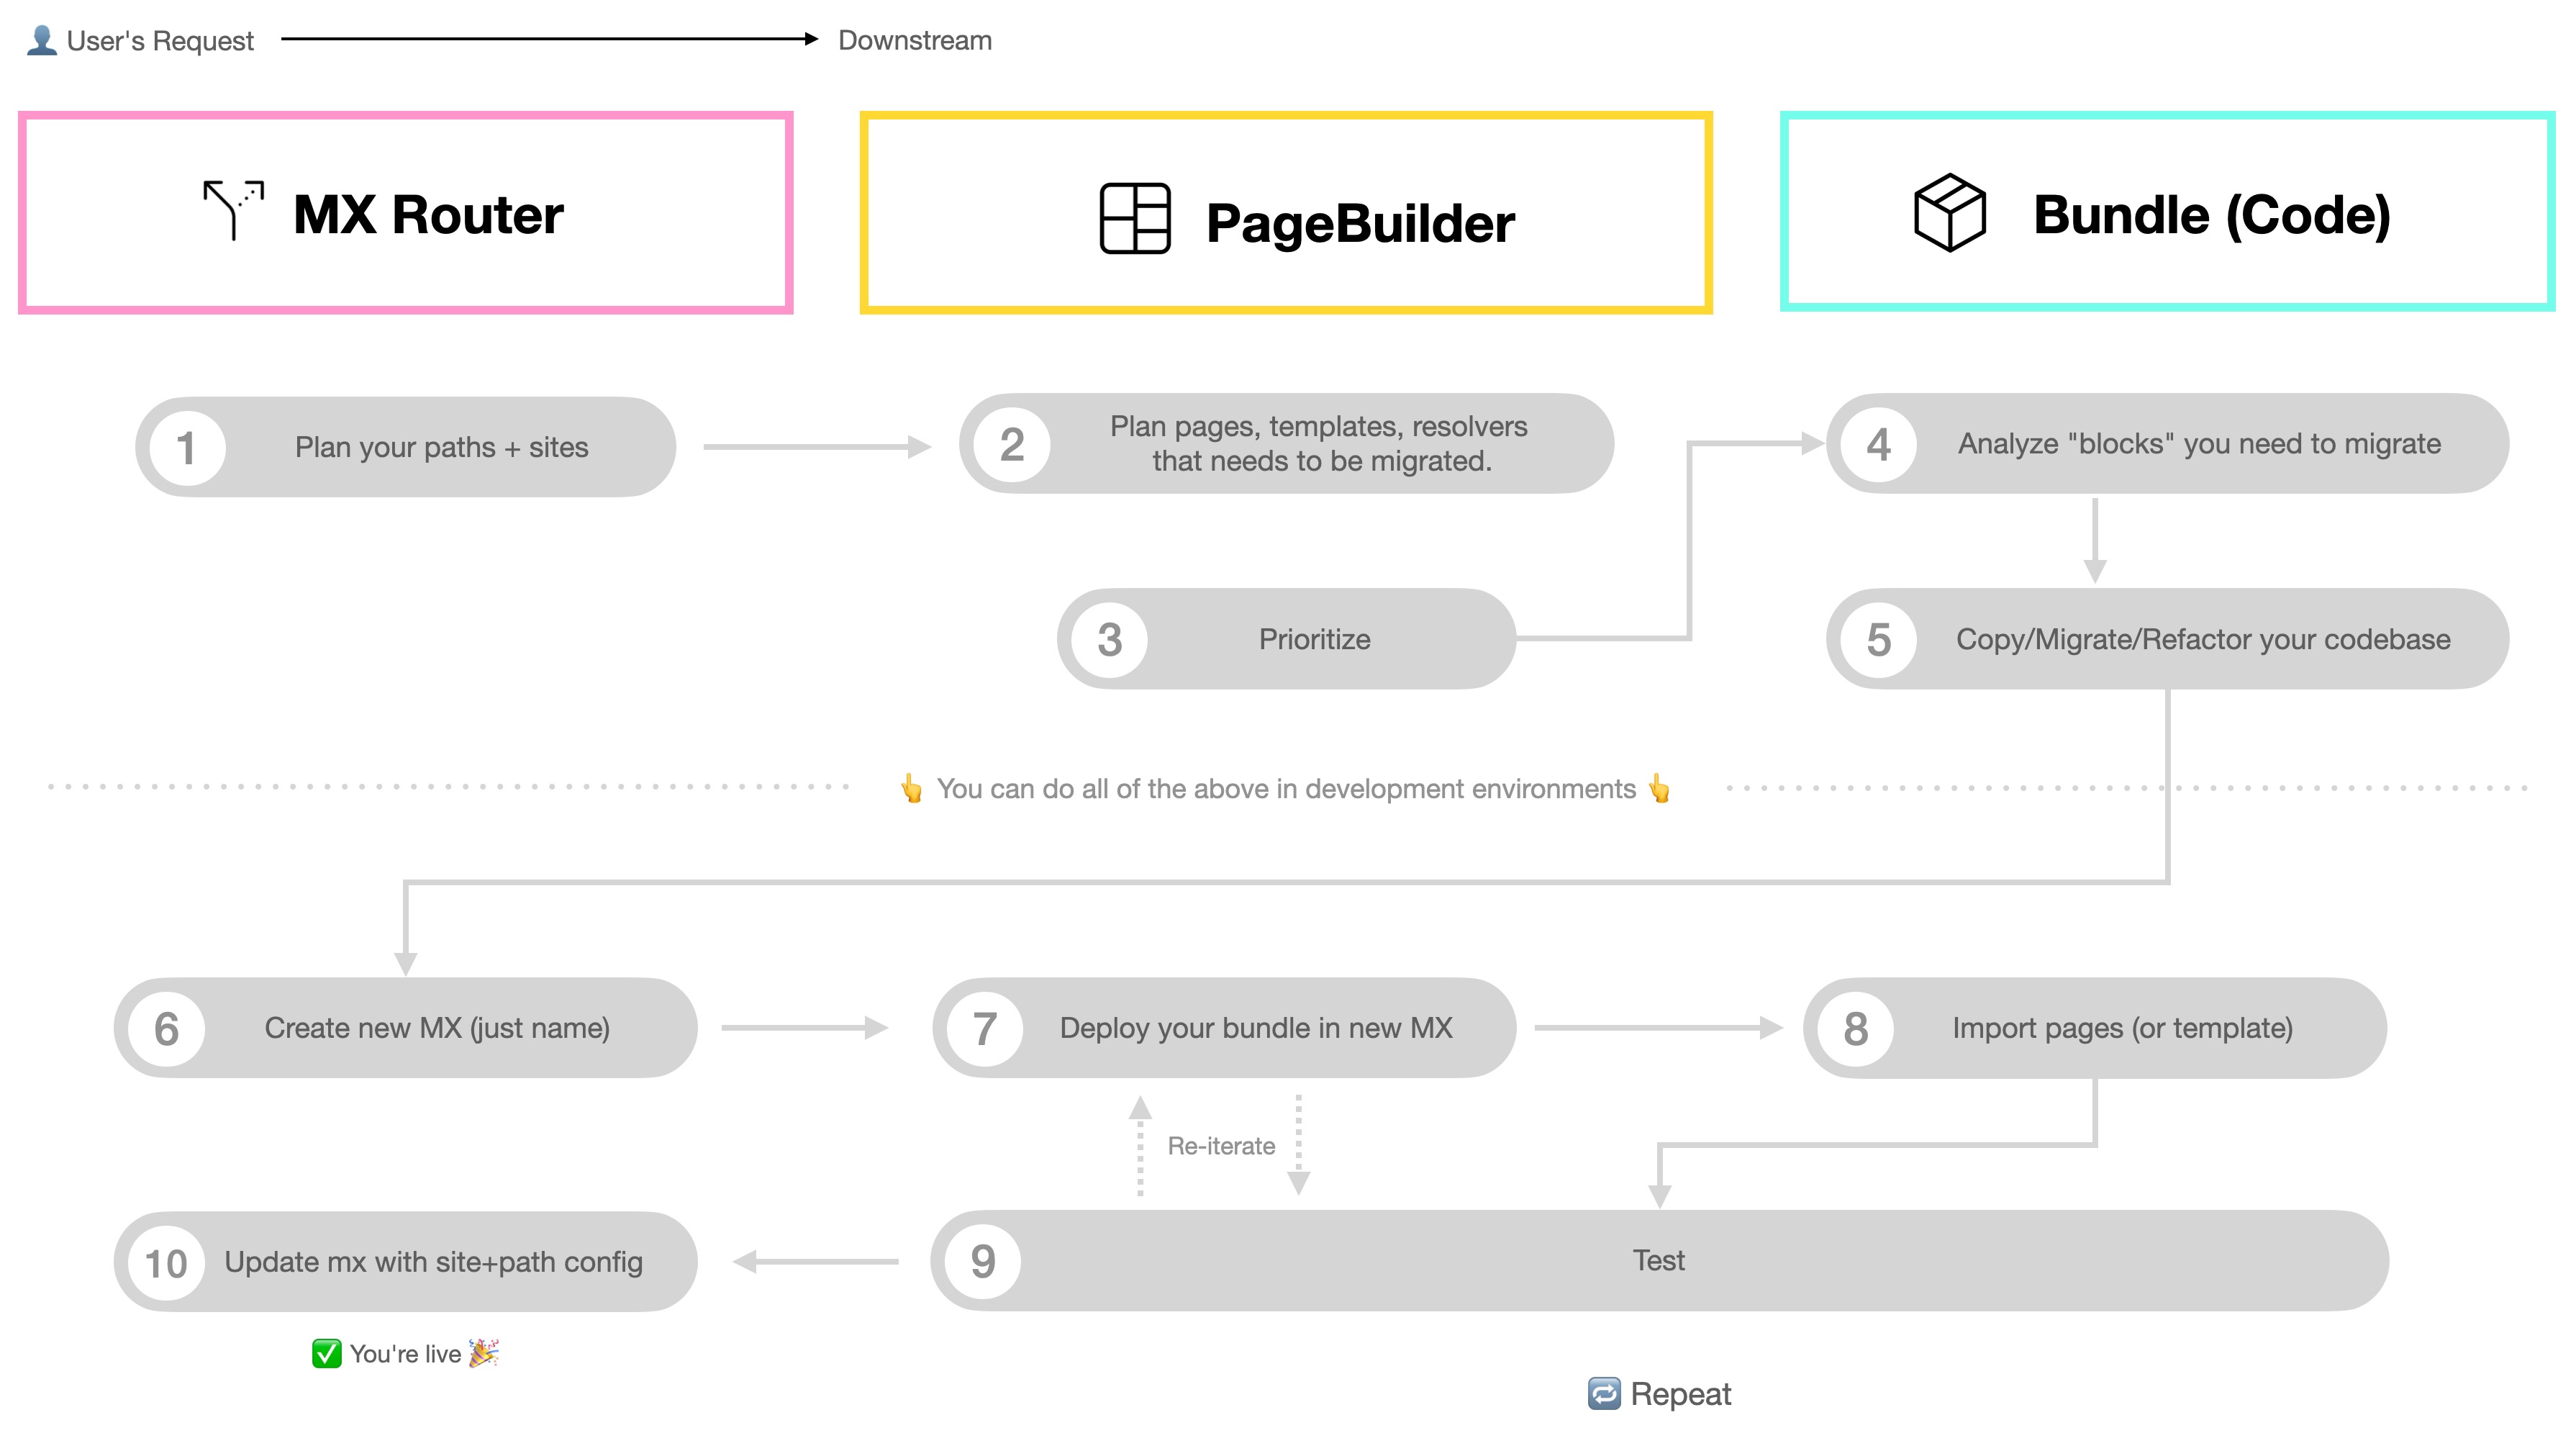
How to migrate part of my existing experience to a separate MX
We’ll dive in each step in depth now.
1. Plan Your Paths and Sites
Identify the specific paths and sites that will be migrated to the new MX. Consider how these will function independently and what dependencies they might have.

Top level view of washingtonpost.com
A sitemap can be really really large, but consider the top section URLs, and some sample article page URLs as sample, when you’re planning. Also stay close to what your readers experience when mapping rather than relying on pure URLs (although we will take action based on URL paths).
When zooming into parts of your experience you consider splitting to separate MX, some sections, section front page and article page URLs will be really clean and are easier to separate:
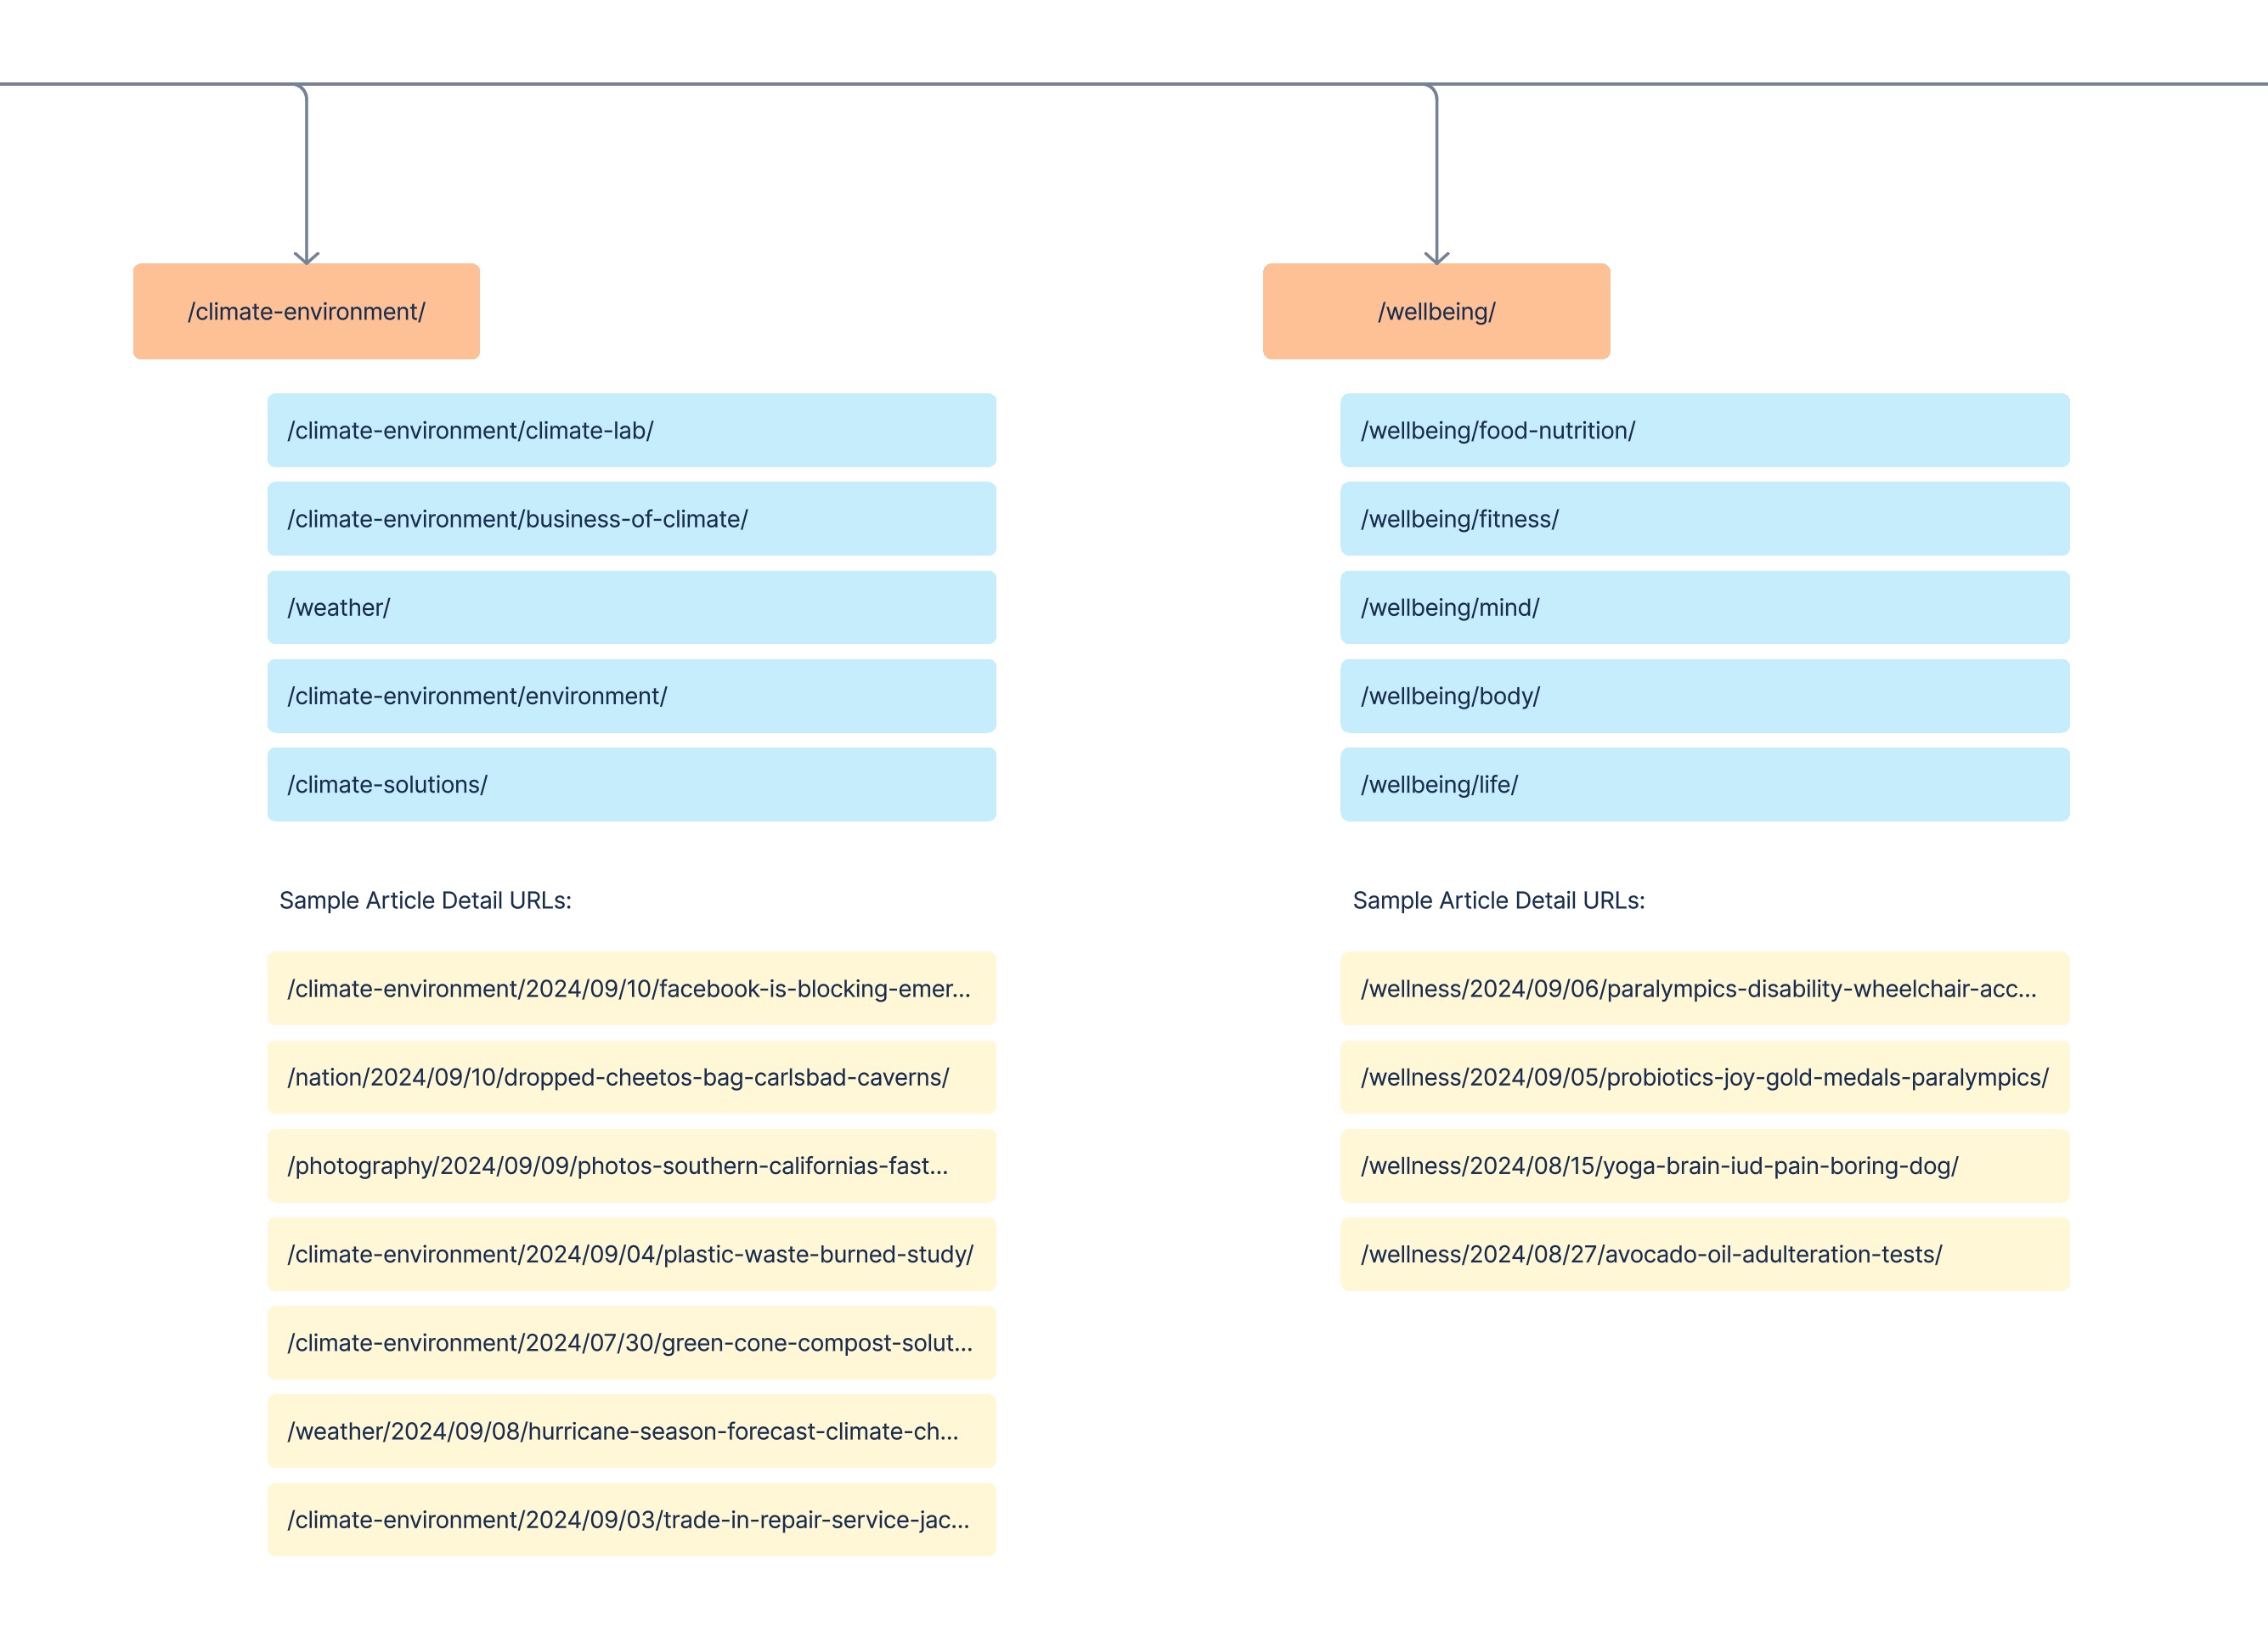
Other sections may have multiple sections referring to each other and have article detail page links not as cleanly isolated. The example above have /wellbeing/ section and article pages would be easier to move to another MX. /climate-environment section has weather, photography, and other section references in them. Although it is still ok those links be rendered by the default or another experience. It’s still viable to consider that section to be separated if they contain distinct blocks.
You may also notice overlapping sections that will be harder to plan an MX split. But this practice will give you a better understanding and a good path to plan your multi-experience strategy.
2. Plan Pages, Templates, and Resolvers to Migrate
Determine which pages, templates, and resolvers are essential for the new MX. Prioritize them based on their importance and usage.
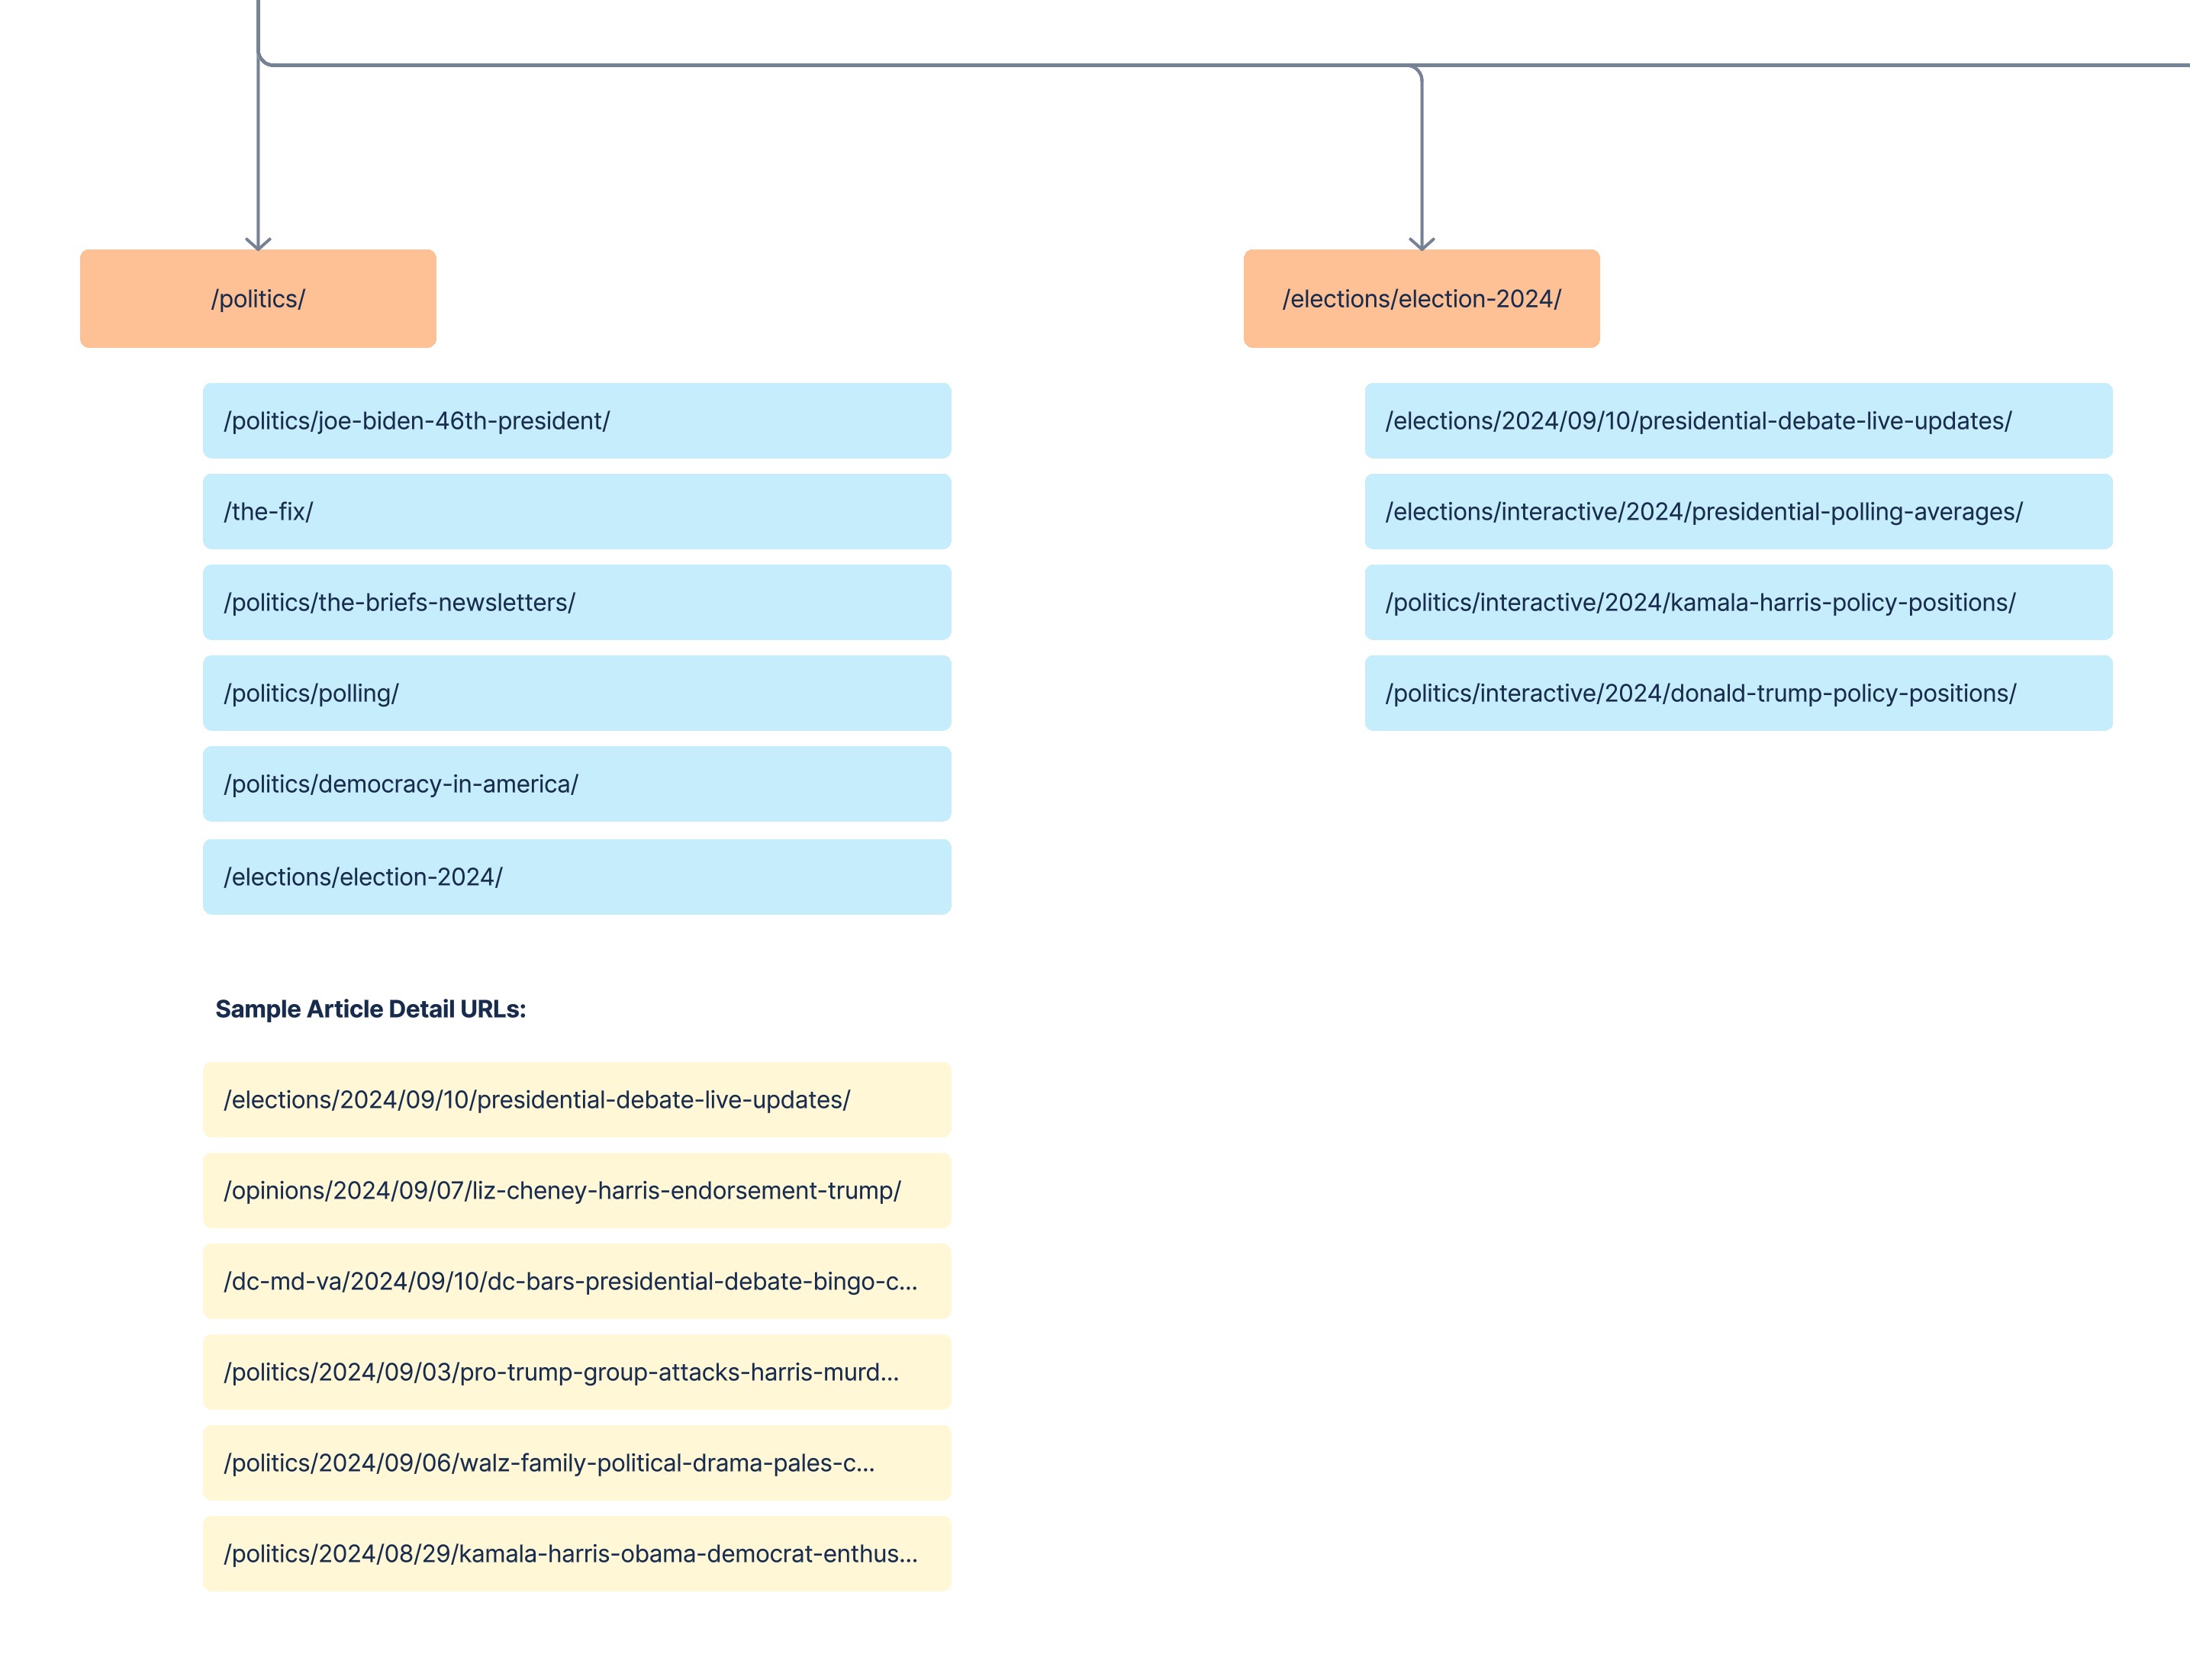
How many regular pages I have under this path?
Let’s say we want to split Election Experience to a separate MX. We want to determine what are the paths for election experience will be, in this example it will be any url starting with /elections/
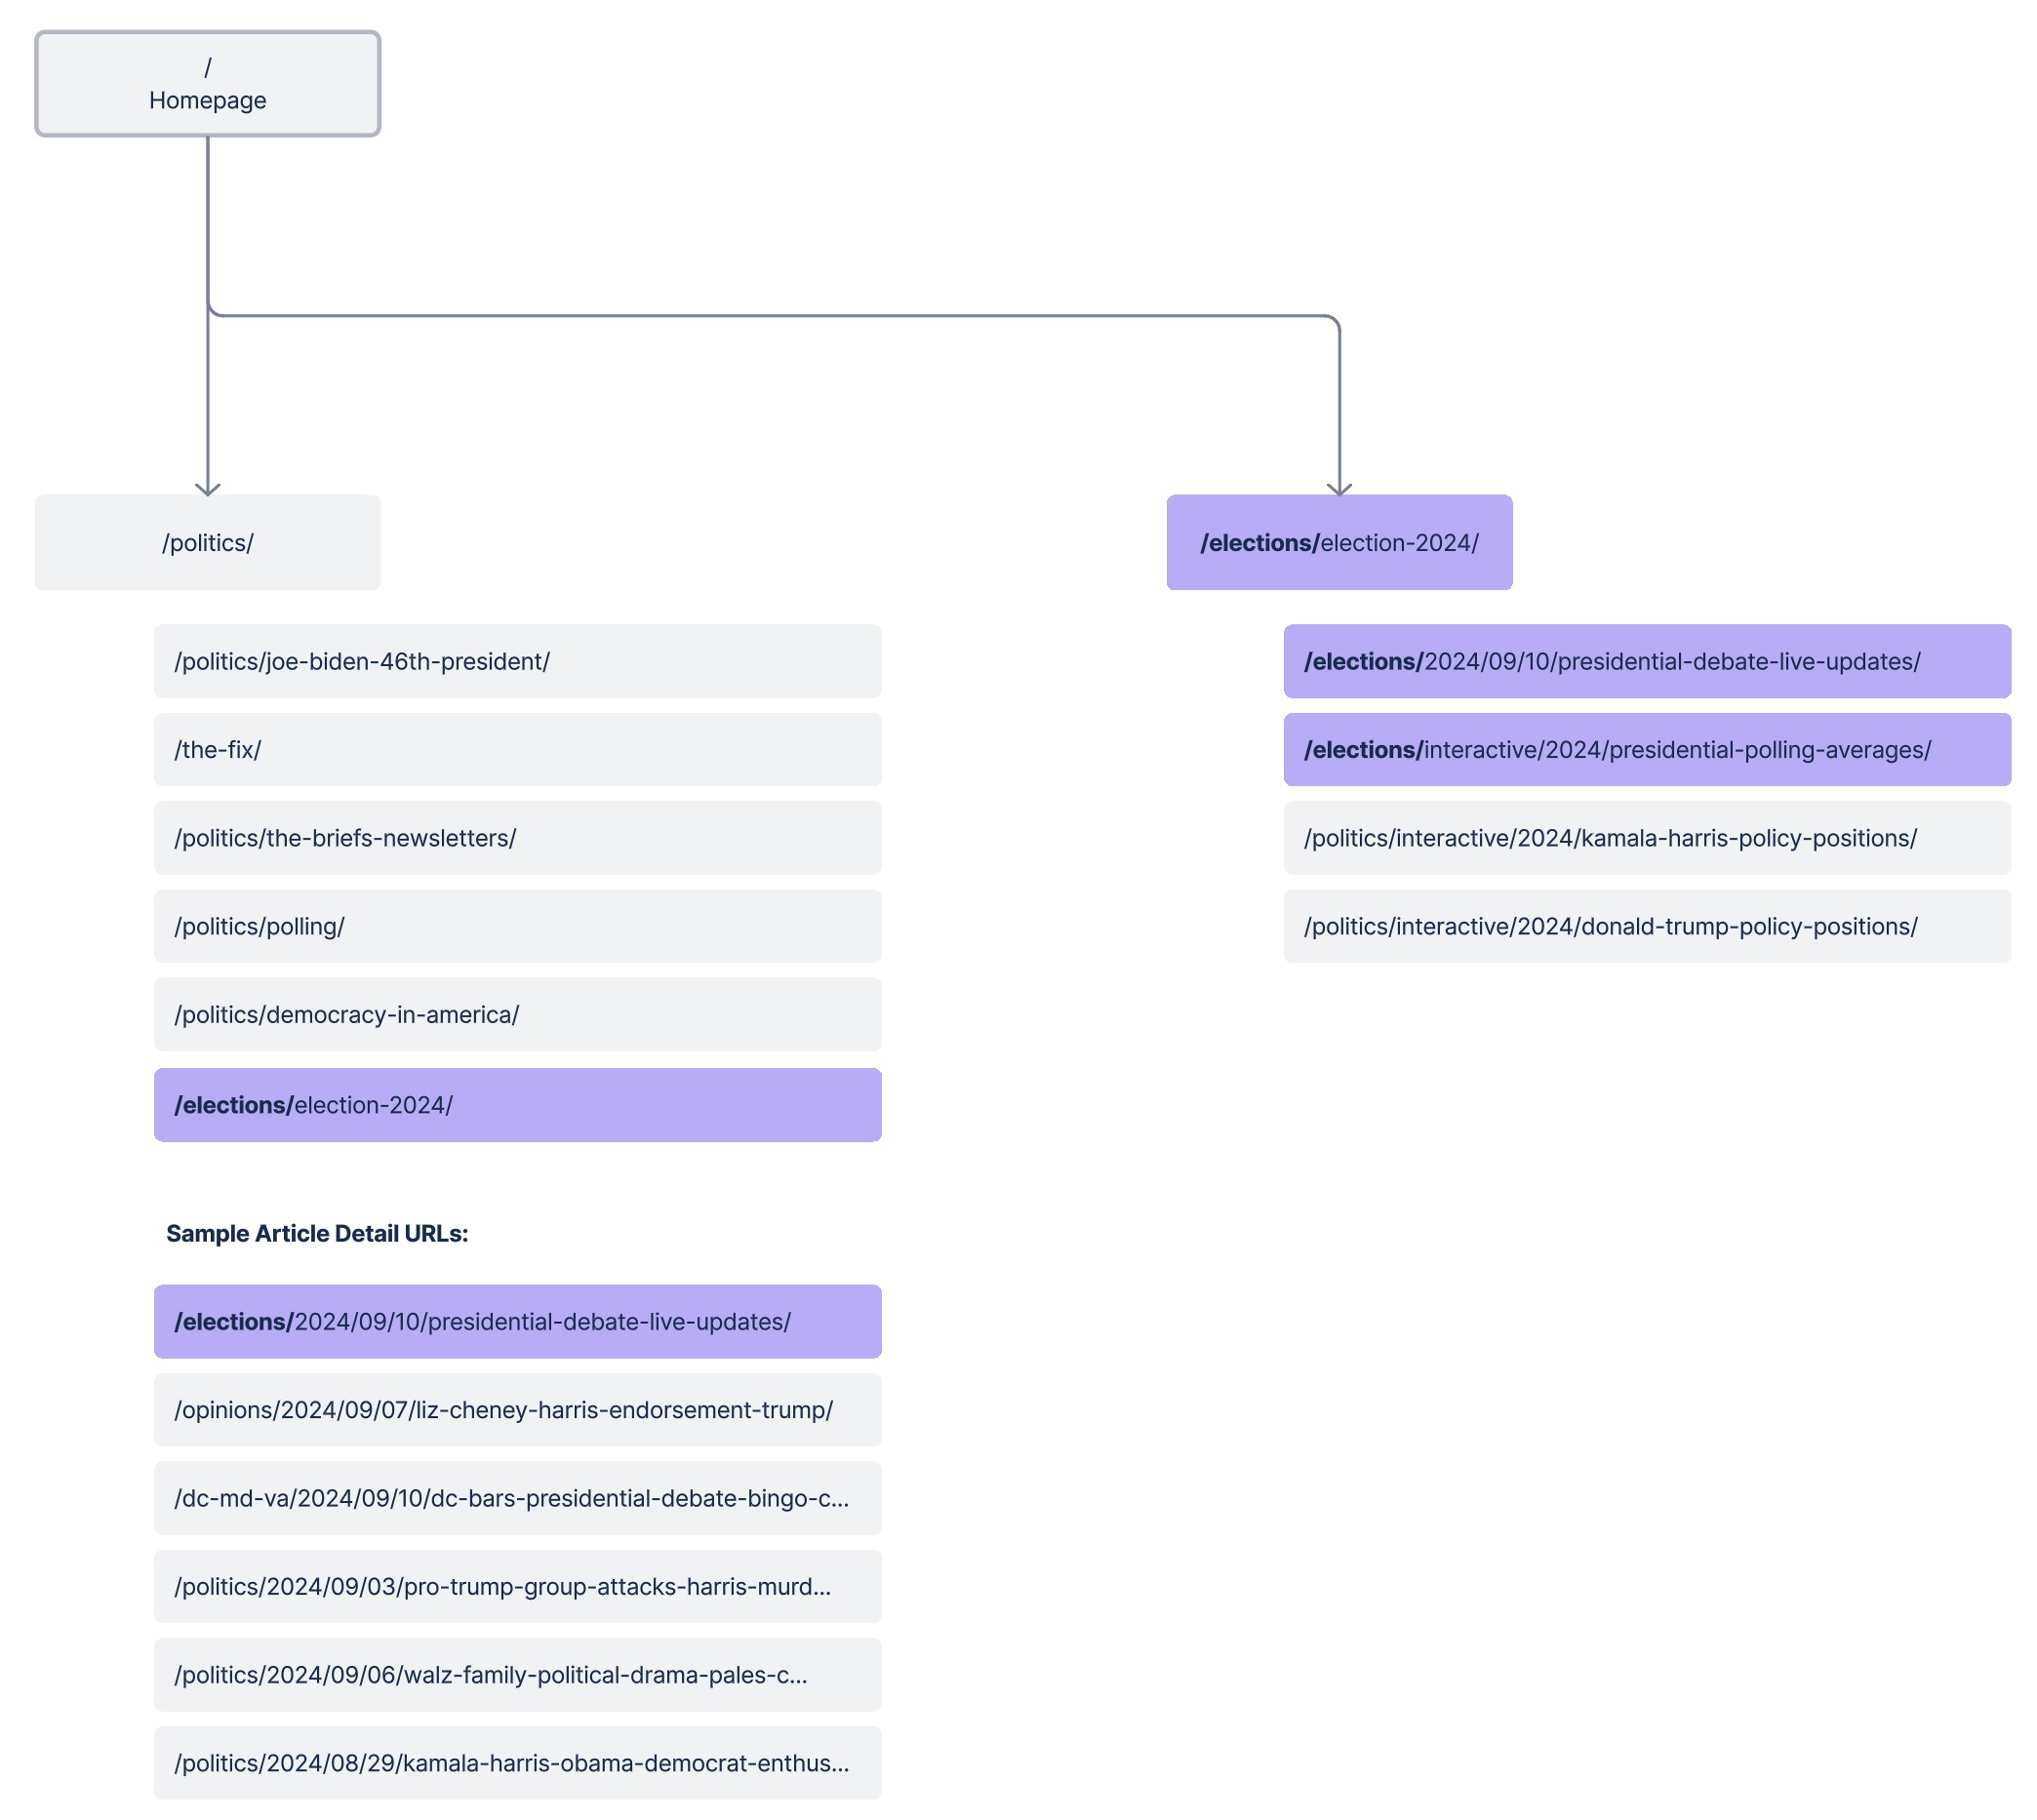
Note: This example is pretty simple, with single path prefix. But you can add multiple path prefixes, or a whole domain in your MX configuration (i.e: having both /elections/ and /politics/election2024/ as two path prefixes you set in your siteMappings).
Which ones are page which ones are template/resolver combination? Which resolvers resolve to these paths?
The sitemap above is just a representation. We want to be inclusive of all URL paths. You can run each URL in PageBuilder > Developer Tools > Debugger > Resolver Debugger.
Select the site, enter the URI (without the domain) and debug.
Page: 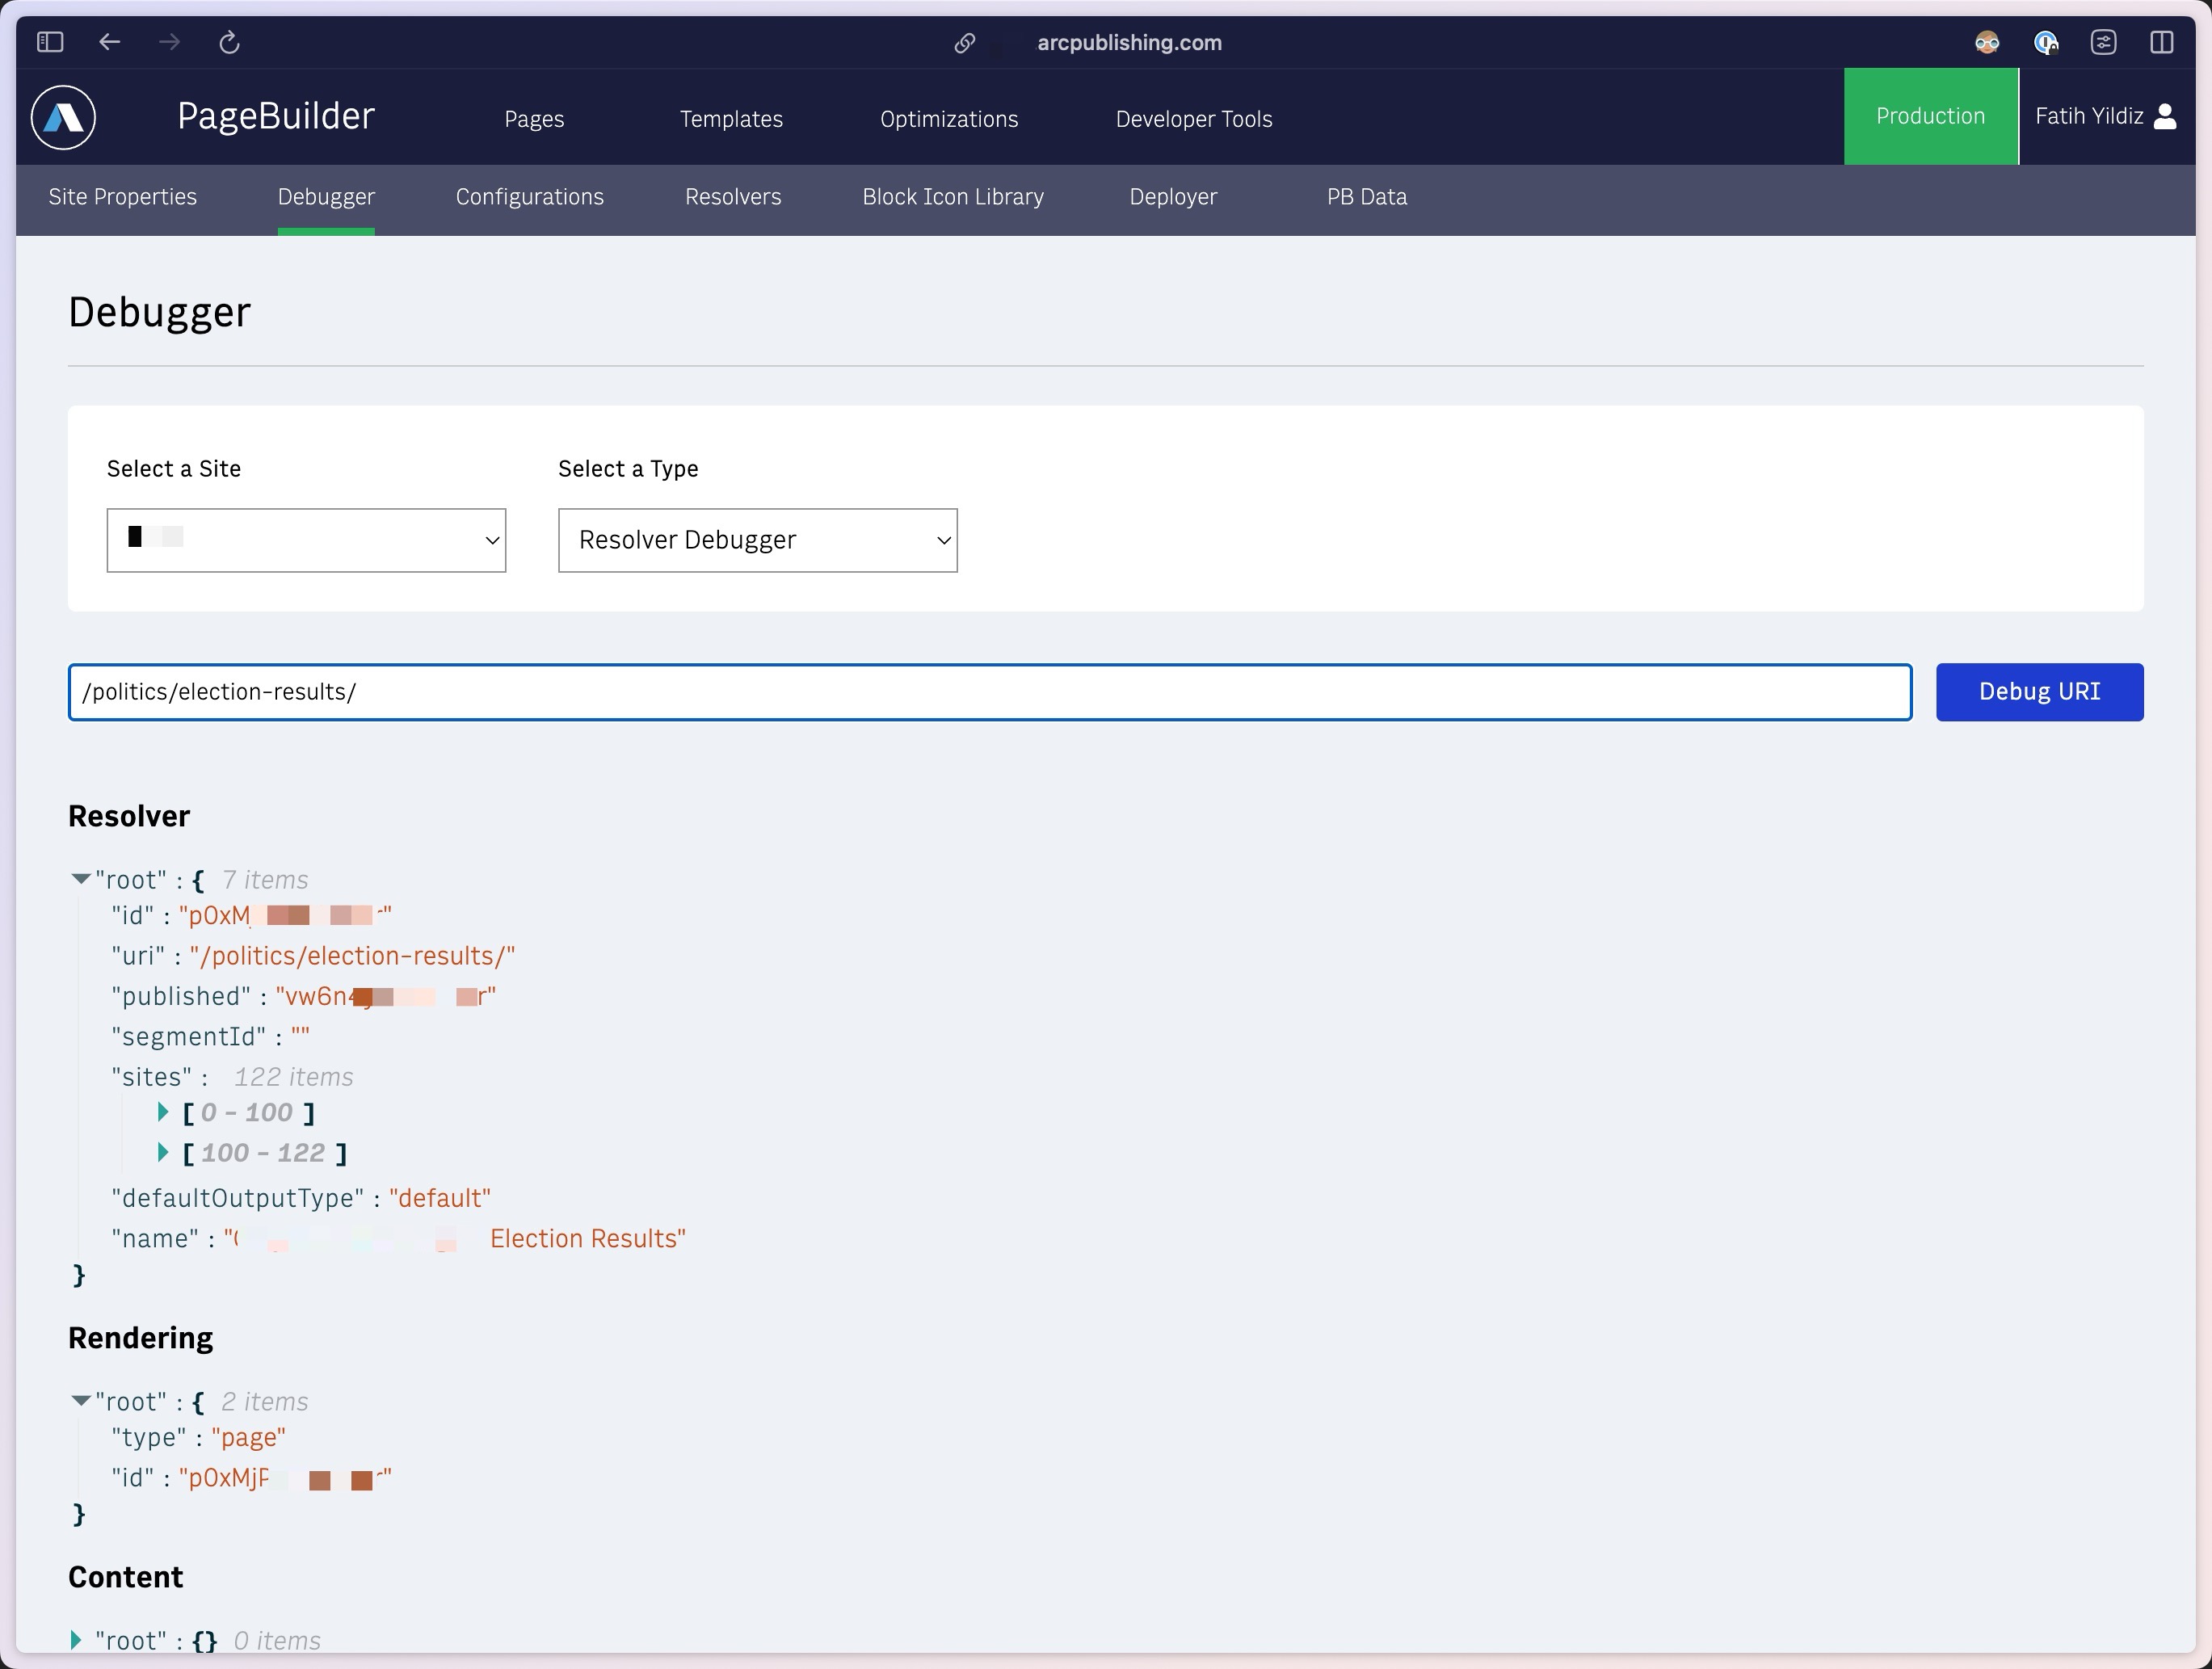 | Resolver & Template: 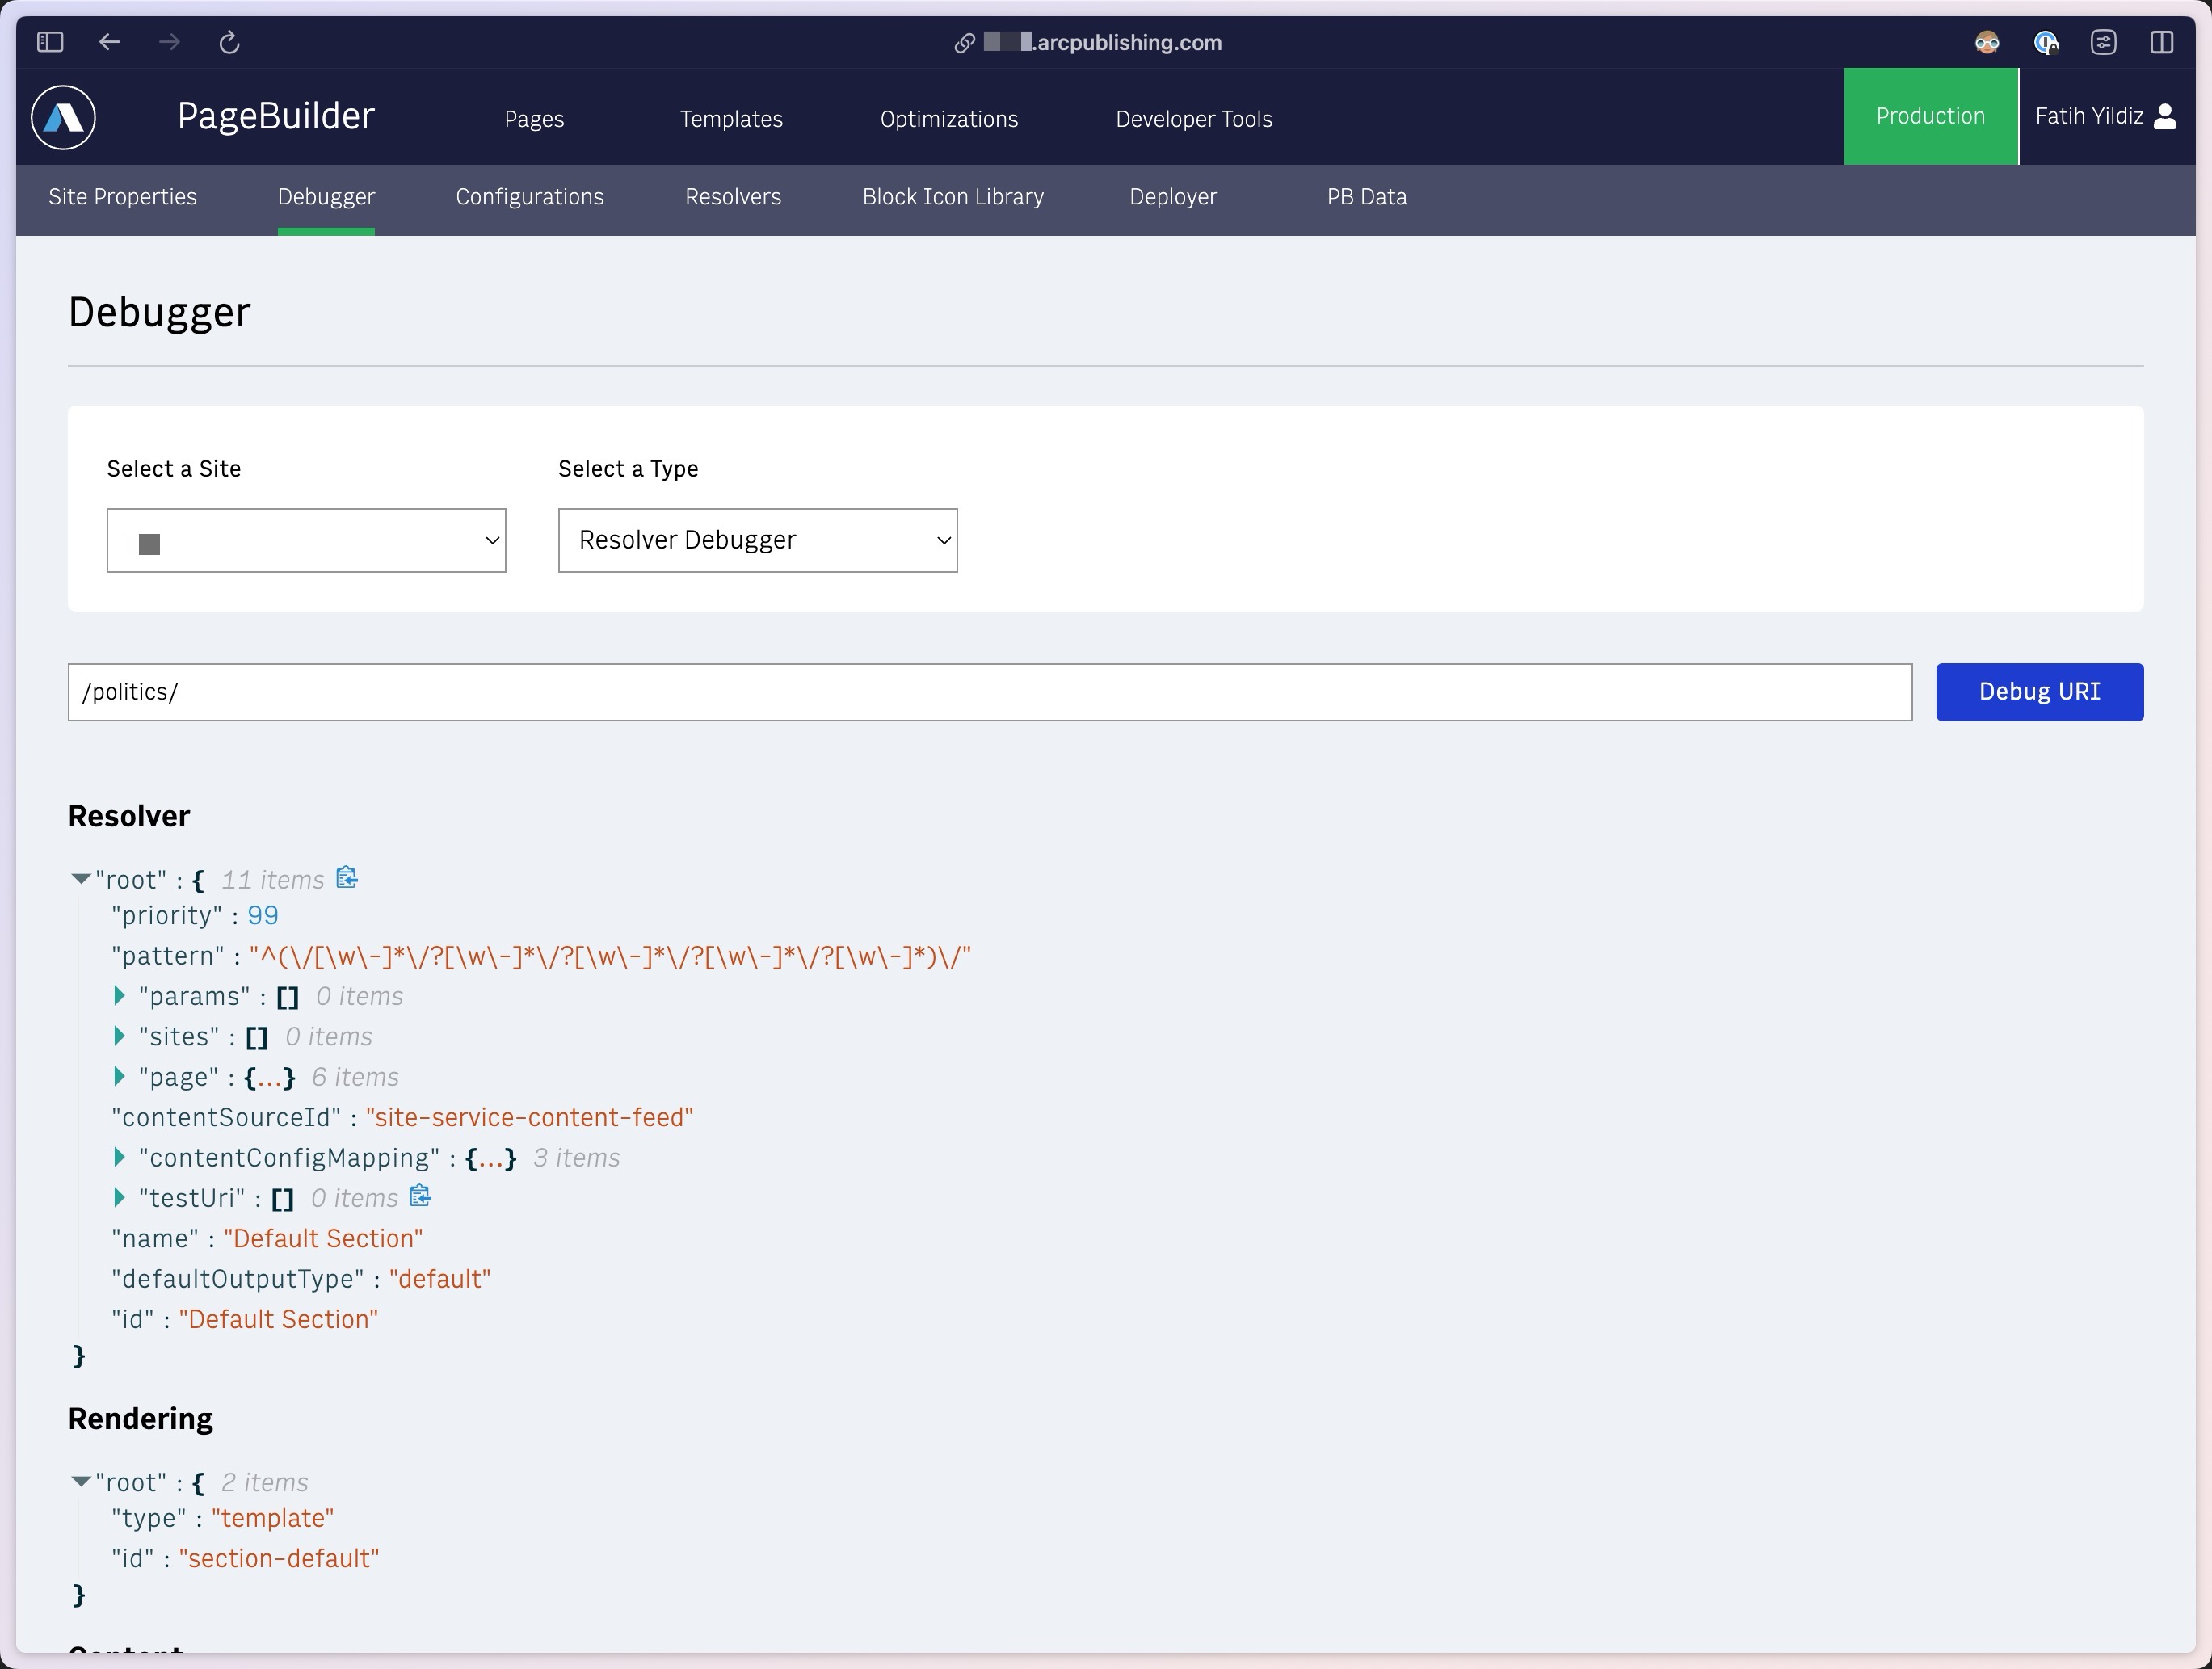 |
Resolver responses will show the resolver id as well as the regex pattern matched.
It’s important to create list of pages, templates and resolver for following steps:
| EXAMPLE URI | PAGE OR TEMPLATE ID | NAME | RESOLVER (IF TEMPLATE) |
|---|---|---|---|
| /elections/ | section-default | Elections | Default Section |
| /elections/election-results/ | p0xMjPS… | Election Results | |
| /elections/election-2024/ | prUe73z… | 2024 Election | |
| /elections/2024/09/10/president… | t47uetD… | [Politics Article] | Default Article |
| … |
This list maybe long depending on how many PageBuilder regular pages and how they are fragmented by each site. The purpose of this step is to take inventory of all possible page and templates that is responsible to render your URLs under certain path (that is your candidate of the new MX).
3. Prioritize
You may want to slowly transition and route live traffic into the new MX, starting with pages which are often easier to understand, troubleshoot. Then publish pages that are higher in traffic. We also suggest starting your migration from more narrow paths, to broader path prefixes, like /elections/ page should be planned last in this list because that’s the broadest path prefix, which will make MX Router to start pointing anything under that path to the Election experience.
| PRIORITY | EXAMPLE URI | ID | NAME | RESOLVER (IF TEMPLATE) |
|---|---|---|---|---|
| 1 | /elections/election-2024/ | prUe73z… | 2024 Election | |
| 2 | /elections/election-results/ | p0xMjPS… | Election Results | |
| 3 | /elections/2024/09/10/president… | t47uetD… | [Politics Article] | Default Article |
| … | /elections/ | section-default | Elections | Default Section |
In this example, we talked about a systematic approach to splitting one Micro Experience: Election. But while doing this analysis and prioritization practice, you may end up wanting to split your current single experience to multiple MX. Even thought you can build multiple MX, test altogether, we suggest more careful approach to start updating your paths and go live one MX at a time instead of doing big launch, to minimize and control the risk.
4. Analyze “Blocks” You Need to Migrate
Identify the blocks of content, features, or components that need to be migrated. This includes understanding dependencies and ensuring compatibility within the new MX.
From the list of pages and templates you identified in the previous step, you can use the pb-data-analysis-scripts which allows you to extract list of features, content sources used in a particular page.
--- Page or Template: #p9NRAEBz90bytDMt ---
┌──────────────────┬──────────────────┬──────────┬──────────────────────────┬───────────────────┬───────────────────┐ │ pageOrTemplateId │ isPageOrTemplate │ uri │ name │ defaultOutputType │ published │ │ varchar │ varchar │ varchar │ varchar │ varchar │ varchar │ ├──────────────────┼──────────────────┼──────────┼──────────────────────────┼───────────────────┼───────────────────┤ │ p9NRAEBz90bytDMt │ Page │ /events/ │ Resources: Arc XP Events │ default │ vZYzKx38ly0bytDMt │ └──────────────────┴──────────────────┴──────────┴──────────────────────────┴───────────────────┴───────────────────┘
--- All features used in: #p9NRAEBz90bytDMt ---
┌─────────────────────────────────────┬──────────────────┐ │ featureName │ countOfTimesUsed │ │ varchar │ int64 │ ├─────────────────────────────────────┼──────────────────┤ │ hero/default │ 15 │ │ resources/resources-v2 │ 15 │ │ form/contact-form │ 15 │ │ alternating-image/alternating-image │ 13 │ │ form/contact-us-handler │ 11 │ │ resources/latestResources │ 2 │ └─────────────────────────────────────┴──────────────────┘
--- Content sources used in: #p9NRAEBz90bytDMt ---
┌─────────────┬────────────────┬──────────────────┐ │ featureName │ contentService │ countOfTimesUsed │ │ varchar │ varchar │ int64 │ ├─────────────┴────────────────┴──────────────────┤ │ 0 rows │ └─────────────────────────────────────────────────┘
See How to check feature/content-source usage using pb-data analysis scripts for more information about this and the rest of the scripts help you analyze your pb-data locally.
After you analyze all pages and templates you are planning to migrate, it would be useful can compile all of them in a table/sheet view.
| PRIORITY | EXAMPLE URI | ID | NAME | RESOLVER (IF TEMPLATE) | FEATURES USED | CONTENT SOURCES USED |
|---|---|---|---|---|---|---|
| 1 | /elections/election-2024/ | prUe73z… | 2024 Election | global/navigation global/alert-bar global/subscribe-box election/candidates-table election/map-2024 article/large-promo | nav-site-hierarchy get-election-candidates election-states-stats content-feed content-api | |
| 2 | /elections/election-results/ | p0xMjPS… | Election Results | global/navigation global/alert-bar global/subscribe-box election/candidates-table election/map article/large-promo | nav-site-hierarchy get-election-candidates election-states-stats content-feed content-api | |
| 3 | /elections/2024/09/10/president… | article-default-template | [Article] | Default Article | global/navigation global/alert-bar global/subscribe-box article/large-promo | nav-site-hierarchy content-feed content-api |
| … | /elections/ | section-default | Elections | Default Section | global/navigation global/alert-bar global/subscribe-box election/candidates-table election/party | nav-site-hierarchy get-election-candidates content-feed content-api |
Your developer team may also want to create a version of that view by each feature and content source, so they can understand how many places each feature is used. This will provide a clear testing plan as well.
| FEATURE | PAGES / TEMPLATES USED |
|---|---|
| global/navigation | < all - shared between multiple MX > |
| global/alert-bar | < all - shared between multiple MX > |
| global/subscribe-box | < all - shared between multiple MX > |
| election/candidates-table |
|
| election/map |
|
| election/map-2024 |
|
| election/party |
|
| article/large-promo |
|
Now your developer team knows exactly which parts of the code needs to be migrated, which parts needs to be planned as shared across multiple MXes.
5. Copy/Migrate/Refactor Your Codebase
Begin the technical migration by copying, migrating, or refactoring your codebase as needed. Ensure that your code is optimized for the new MX environment.
6. Create New MX
Request the creation of a new MX through Arc XP Customer Support. Provide the name you want for this MX. This name identifies the MX in your Arc home.
See Getting Access to Micro Experiences for what you need to provide to Arc XP Customer Support.
7. Deploy Your Bundle in New MX
Deploy your code bundle within the new MX. Make sure that the deployment pipeline is correctly configured for the new environment.
If you are using Deployer UI to make deployments, you will find your Election Experience’s deployment history and actions in the same place in Election Experience’s PageBuilder > Dev Tools > Deployer menu.
If you are setting up your CI/CD to automatically deploy to the new Election Experience, see Deployments section in Micro Experience Developer Guide
8. Import Pages (or Template), and Publish
Import the necessary pages or templates into the new MX. Ensure that they are correctly mapped to the appropriate paths and sites.
From your existing experience’s PageBuilder, your can click “…” and “Export Page” that will download a .pbexport file.
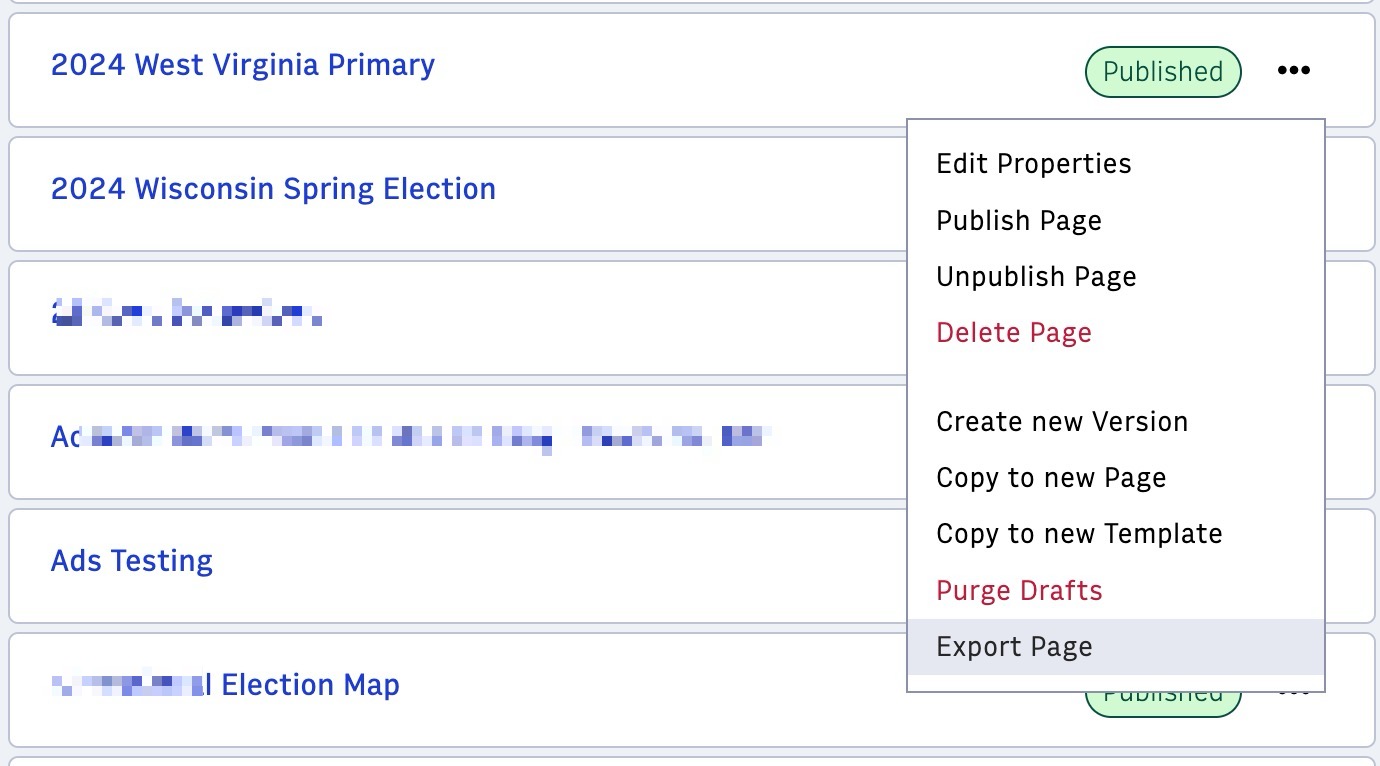
Exporting templates are same as pages.
On the new Election Experience’s PageBuilder, you can open “Create Page”, then use “Import” button to upload the .pbexport files to import your pages and templates.
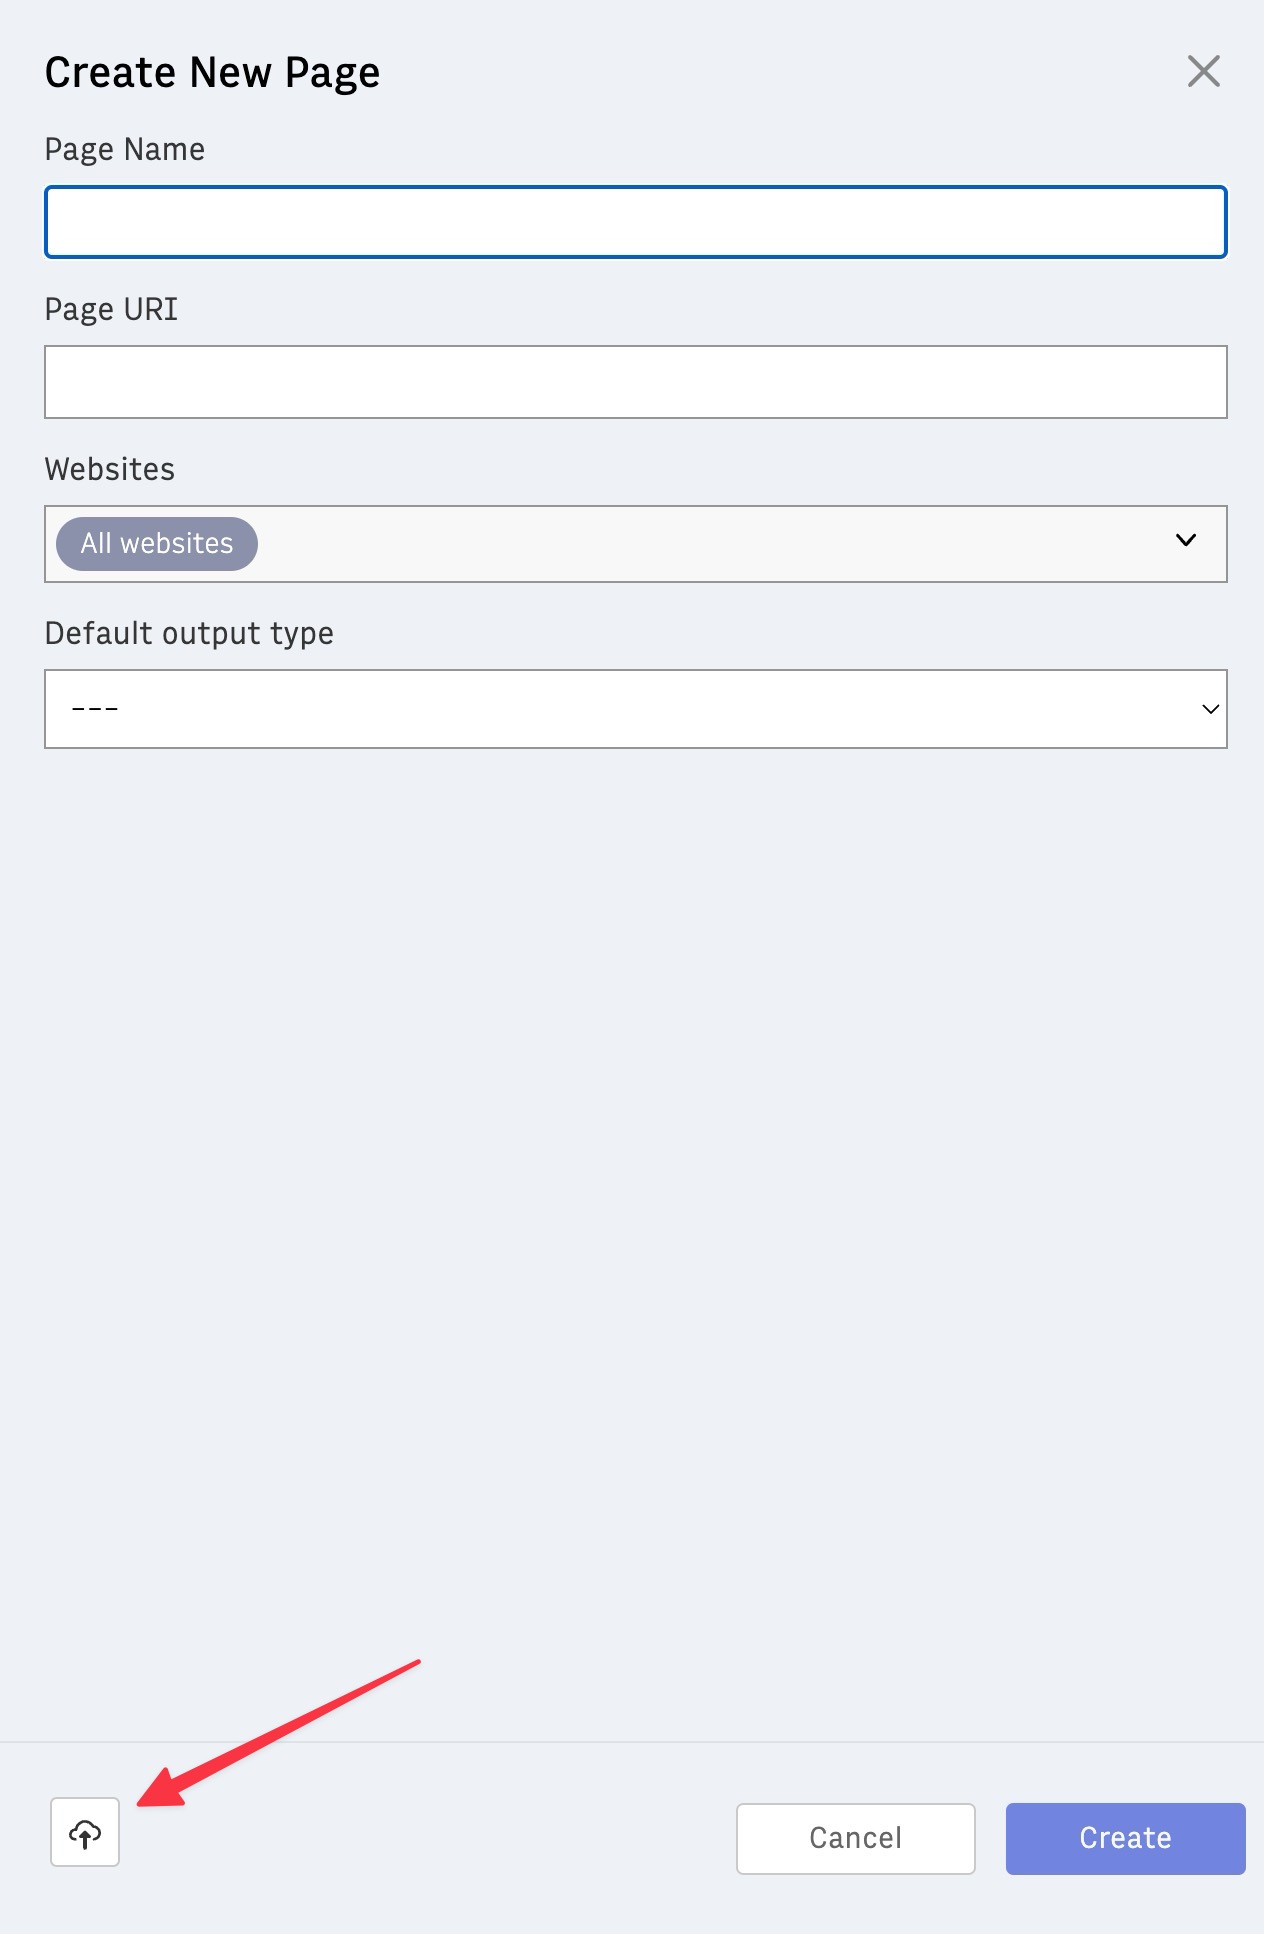 | 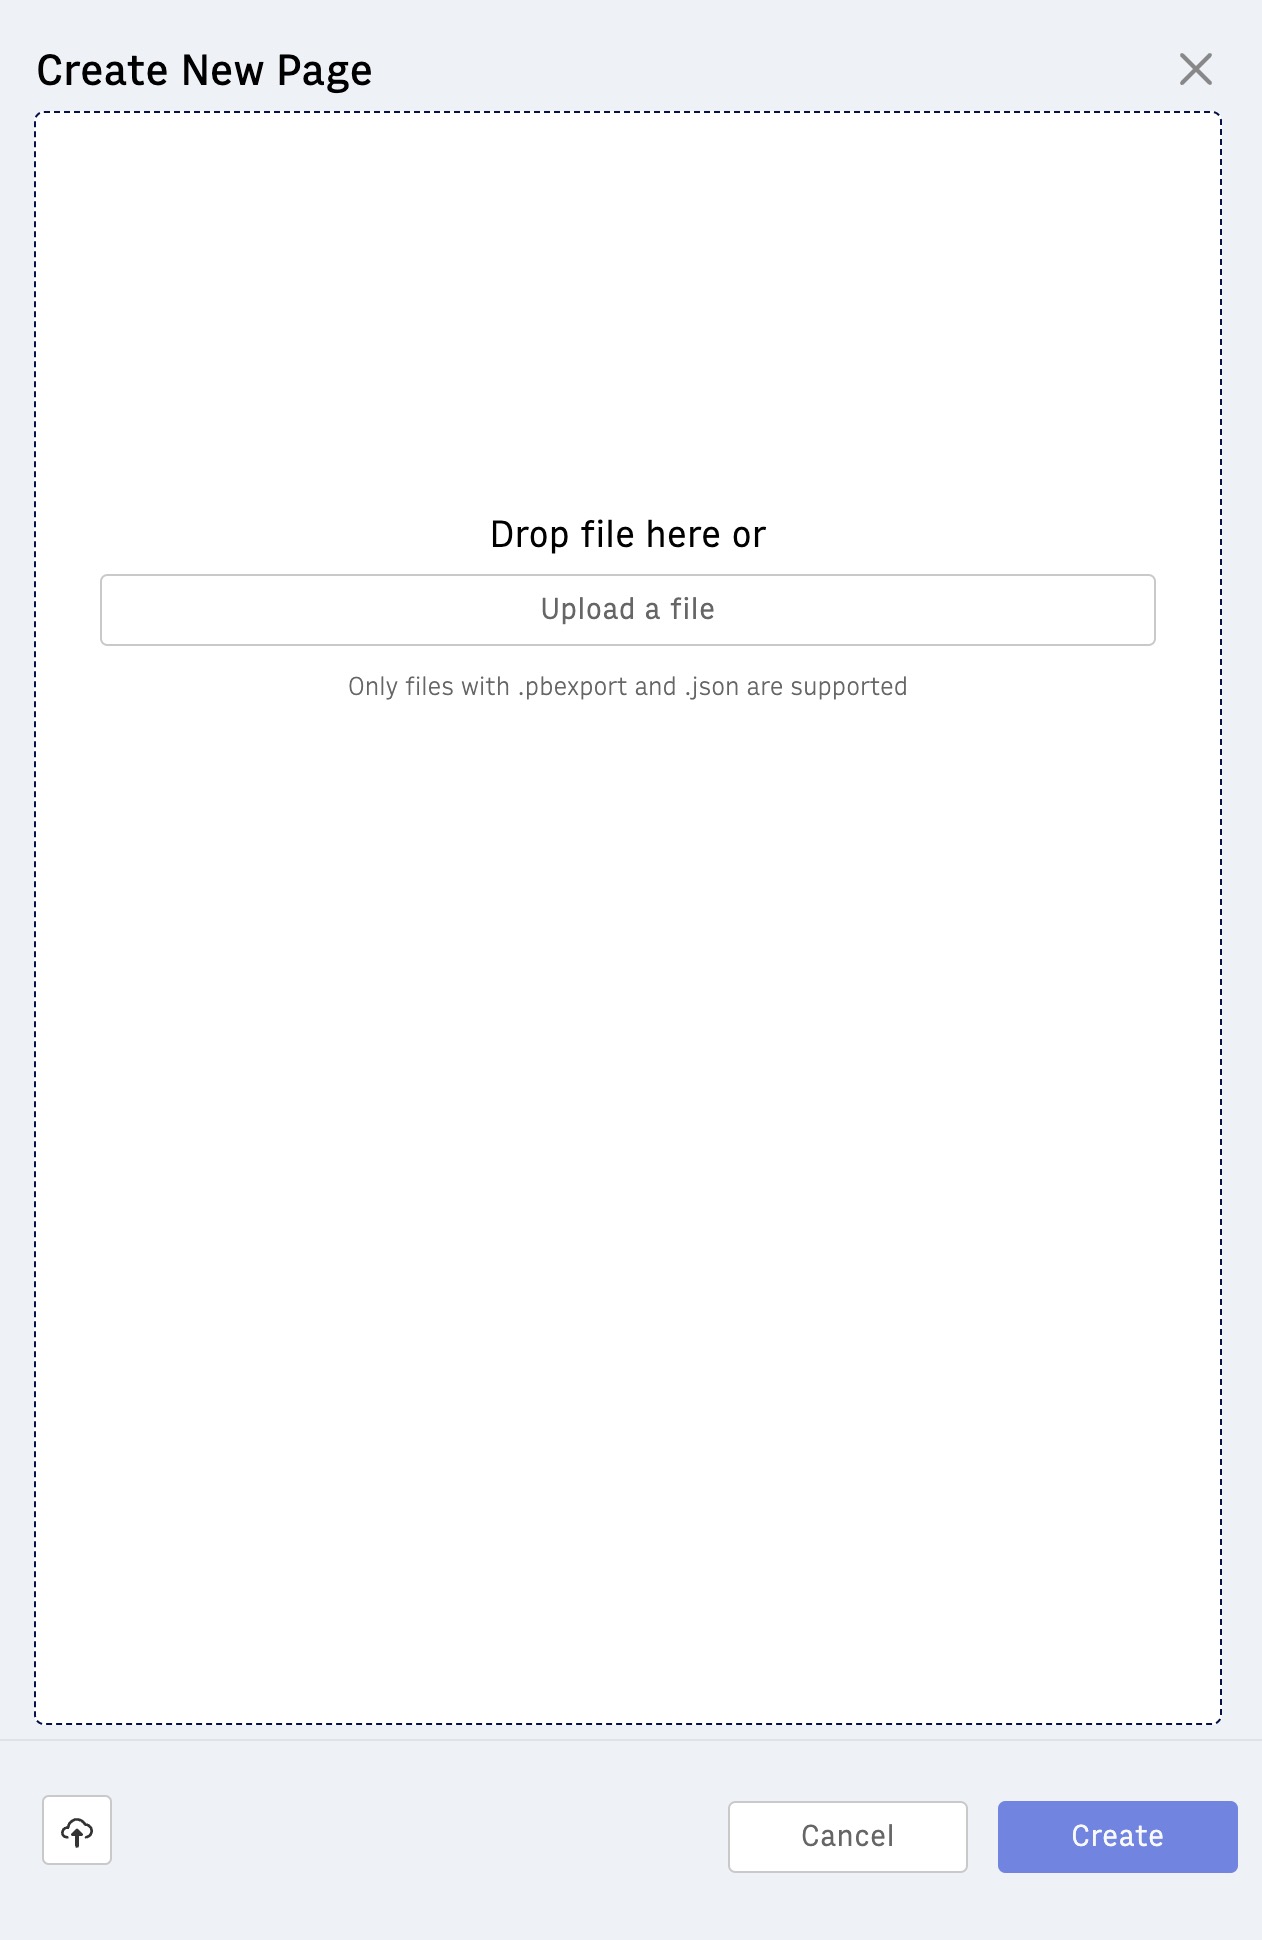 |
9. Test
Thoroughly test the new MX to ensure that everything functions as expected. This includes testing paths, templates, and any interactions between different components.
The table of pages with sample URLs you created in step 2 will be really useful in this step. Your team can also use the developer-focused version of this table that was organized in step 4 (features and content sources used in each page).
See How to preview pages with MX for how to test your pages.
10. Update MX with Site and Path Config
Finalize the migration by updating the MX with the correct site and path configurations. This step ensures that your MX is fully operational and integrated into your broader environment.
See How to update traffic routes between multiple experiences to learn how to update site mappings using MX Service API.
Your page(s) are live. Your readers will start seeing pages rendered by the new MX after existing CDN cached pages expire and your pages gets rendered.
You should monitor your traffic, your PB Render Dashboard metrics, page speed and other key metrics to ensure your readers experience is stable.
Based on your approach in prioritization in step 3, you can repeat the same steps for the remaining pages/URLs to continue migrating your section to the new experience. We suggest doing the migration in smallest possible batches, starting with more narrow URL paths and slowly going broader. This will provide more iterative process to your team; increase confidence with Micro Experiences, and also adopt your live traffic across two different Experiences.
See Migration FAQs in Micro Experiences FAQ