Optimizing (unzipped) lambda size with pre-building large dependencies
With Engine 5.0.4, we released a new build configuration that helps optimize the compiled bundle on average 30% smaller server-side bundle size (in some samples up to 80%). See Optimize large bundles’ build size with content source compilation dependency duplication guide for more information.
When a PageBuilder bundle is deployed, client code (features, content sources, and so on) gets bundled together with PageBuilder’s core and packaged together to be placed into an AWS Lambda function.
AWS enforces a 250 MB lambda code size limit. This is unzipped code that runs the Engine and client bundle together.
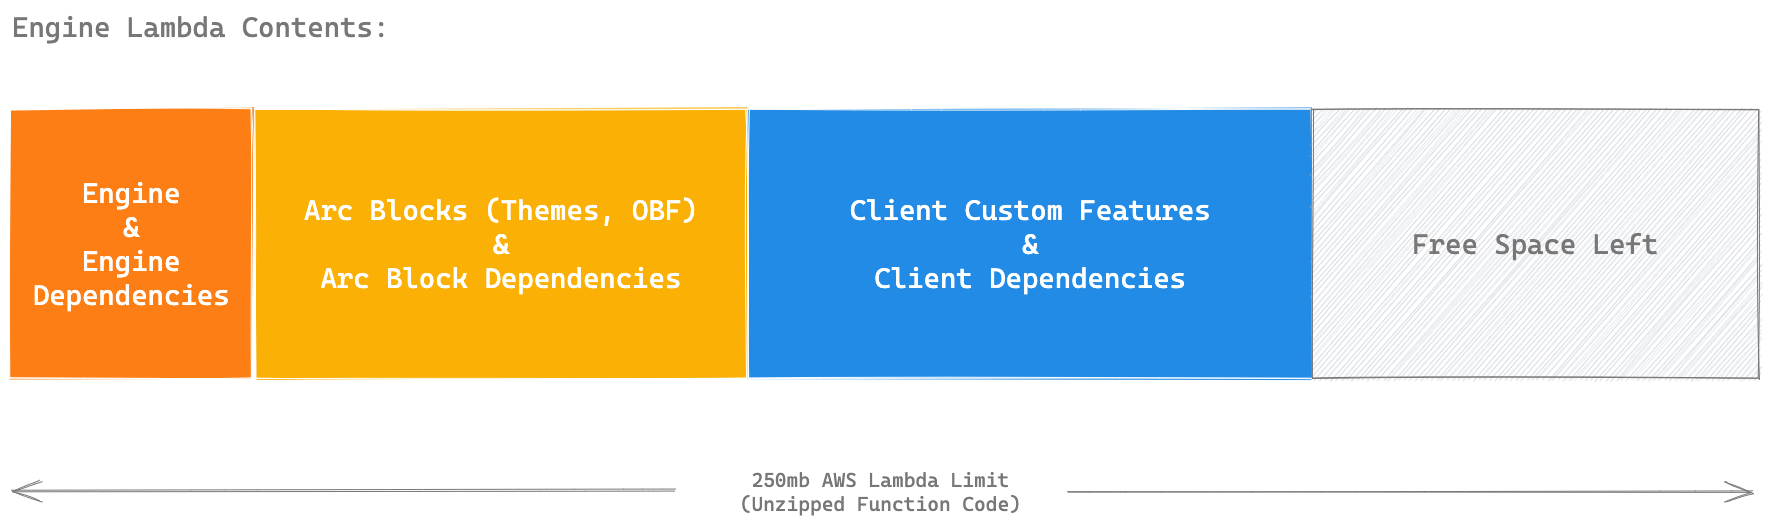
PageBuilder code, Arc XP blocks, and custom blocks code, along with their dependency packages, all have to share this space inside the lambda functions.
PageBuilder’s own dependencies and other Arc XP dependencies (Themes and Outbound Feeds blocks, for example) make it hard to predict the reserved size to enforce a size limit for custom code.
Bundles that require larger and more complex dependencies may hit these limits sooner than expected.
Arc XP’s team is actively working on optimizing the standard build process to package and compress all dependencies more efficiently. In the meantime, you can optimize bundles bumping into these limits by performing a pre-deployer build that can do simple tree shaking and minification on its large dependencies.
Quick wins before the pre-build approach
Before reaching for the webpack pre-build, run through these two checks. Either one is often the actual cause when a bundle unexpectedly hits the size limit.
1. Audit package.json for mis-classified dependencies
The Deployer installs everything in dependencies into the Lambda artifact. Not just what your code imports. Every package pulls in its full transitive tree.
One common source of bloat: the bundle repo is also used for another platform, like a mobile app. Packages added for React Native or other non-PageBuilder targets can quietly land in dependencies. They never run in the Lambda environment, but they still count against the limit.
Look for:
- Unused packages: if a package isn’t imported anywhere in your PageBuilder features or content sources, move it out of
dependencies. - Dev and build-only packages: test runners, linters, and coverage tools belong in
devDependencies. - Framework packages Engine already provides:
react,react-dom, andprop-typesare externalized by the Engine build. All three can go indevDependencies.
Run npm ls --depth 0 to list top-level installed packages and compare against what your bundle actually imports at runtime.
2. Audit what goes into the bundle zip
Make sure your CI/CD pipeline is using the official deployer script (deployer.js / deployer.sh), not a raw zip of the repo root. A raw zip will pick up large folders that serve no purpose in a Lambda deployment.
Common offenders:
coverage/: Jest/Istanbul coverage reports can reach 10–20 MBjest/selenium/docs/themes/: if managed separately from the bundle
Run du -sh * | sort -rh in your bundle root before deploying to spot unexpected large folders.
If both checks come back clean and the bundle is still over 250 MB, move on to the pre-build approach below.
Setting Up the Build Environment
To optimize the build process, you must first configure Webpack and install build dependencies. This guide uses highcharts as an example of a large dependency (40+ MB) that needs optimization.
-
Configure Webpack
- Create a
webpack.config.jsfile in your root folder. The webpack configuration defines how webpack processes your dependencies:- The
entryproperty points to your source file (wrapper.js) containing dependencies to optimize. - The
output.pathproperty specifies the compilation output location (modulesdirectory).
- The
webpack.config.js var path = require('path')module.exports = {entry: './wrapper.js',mode: 'development',target: 'node',output: {path: path.resolve(__dirname, 'modules'),filename: 'wrapper.js',libraryTarget: 'commonjs2',},externals: {react: 'react','react-dom': 'react-dom','mock-require': 'mock-require'},module: {rules: [{test: /\.jsx?$/,use: {loader: 'babel-loader',}}]}} - Create a
-
Install Build Dependencies
a. Run the following command to install the required development packages:
npm install -D webpack webpack-cli @babel/core @babel/plugin-proposal-export-default-from babel-loaderb. Add the pre-build script to your
package.json:{...,"scripts": {...,"pre-build": "webpack --mode production"},...} -
Identify Dependencies to Optimize
a. Run the size analysis command:
du -hs * | gsort -h -r # On non-Mac systems, use 'sort' instead of 'gsort'.b. Review the output to identify large dependencies:
49M amazingcharts24M date-fns7.2M @babel5.7M es-abstract4.9M lodash4.0M styled-components3.8M luxon3.6M polished... -
Create Dependency Wrapper
a. Create a
wrapper.jsfile in your root folder.b. Import and export the identified large dependencies:
wrapper.js module.exports = {"highcharts": require("highcharts"),"highcharts-react-official": require("highcharts-react-official"),}c. Run the pre-build command:
npm run pre-build -
Update Package Configuration
a. Move optimized dependencies from
dependenciestodevDependenciesinpackage.json. This action prevents including rawnode_modulesversions in deployment. -
Update Import Statements
a. Replace original imports with references to the compiled wrapper:
// Path to the compiled wrapper.js in the modules directoryconst wrapper = require('../../../../modules/wrapper');const Highcharts = wrapper['highcharts']; -
Test and Deploy
a. Test your local changes with the following steps:
i. Remove original package folders:
```rm -rf node_modules/[package-name]```ii. Restart development environment:
```fusion stopfusion start```iii. Verify page rendering.
b. Deploy your bundle with the following steps:
i. Deploy your bundle to a non-production environment.
ii. Test in preview mode.
iii. If successful, proceed to production deployment.
Example Results
Tests of this optimization process with the highcharts library (40+ MB disk space) give the following results:
-
Original deployment:
- Total lambda function size: 145 MB
- node_modules size: 95 MB
-
After optimization:
- Total lambda function size: 93 MB
- node_modules size: 41 MB
This optimization frees approximately 50 MB of space by applying the technique to a single large package dependency.
Consider splitting your bundle with Micro Experiences
If the pre-build workaround is something you are running on every deploy, the bundle has grown past the point where size optimization alone keeps up.
Micro Experiences (MX) lets you split into multiple PageBuilder instances, each with its own codebase and Deployer. Smaller bundles mean smaller Lambda footprints, faster compile times, and independent deployment pipelines. A team working on subscriptions does not need to be in the same bundle as the team building sports features.
Getting set up with MX takes some planning, but if you are regularly hitting Lambda size limits, it addresses the root cause rather than working around it.