Setting Up Newsletter Integrations
Newsletters continue to be an impactful way to reach your readers. In this document, we walk through how to get the amazing content you are creating in Arc XP over to your newsletter client.
Workflow Overview
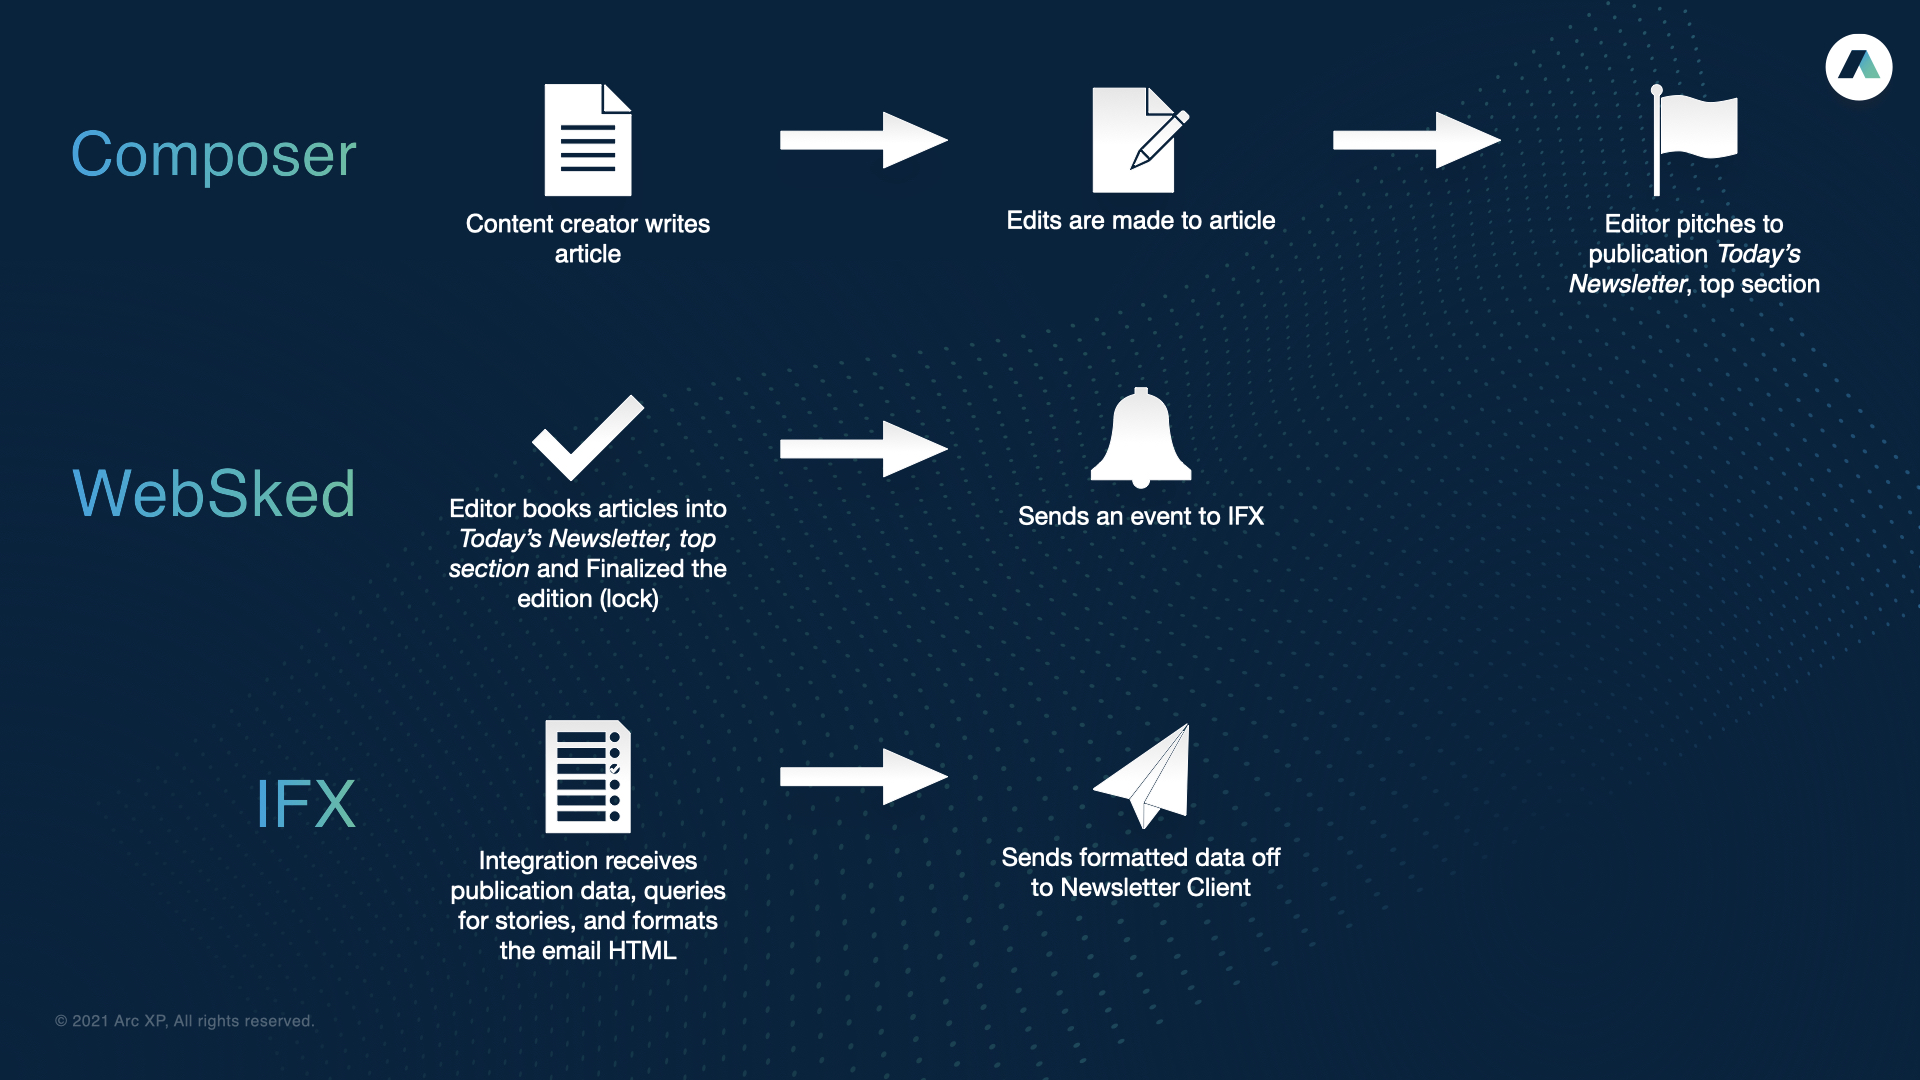
- Article is created in Composer.
- Article is “pitched” to the Today’s Newsletter publication, either from inside the article in Composer or from WebSked.
- The person in charge of the newsletter goes into the publication in WebSked and “books” the stories they would like in that section of the newsletter. When they have all the articles they would like to include, they hit the lock icon above the publication section, triggering the
websked:edition_finalizewhich is sent to your IFX integration (explained more below). More about Publications here.

As the flowchart above shows, we are going to break this into systems - WebSked, Composer, IFX, and your newsletter client. Let’s start with IFX.
Prerequisites
- A general understanding of how to Create and Manage IFX Integrations
- “Access WebSked” permission applied to your role in order to create and manage publications
- A newsletter client or email marketing software to build and distribute the newsletter email, such as SendGrid. Check with Arc XP Customer Support about the email service providers that Arc XP has partnerships with.
- An understanding of how to How to Create a Feature Component
Workflow
Set up Your Email Service Provider
Before proceeding with any integration steps, it’s essential to familiarize yourself thoroughly with your chosen email service provider and its capabilities to ensure a smooth setup process. Providers can vary significantly in their capabilities and requirements for creating email templates, signing up users, and creating mailing lists. Each provider may have its own unique template builder or markup language, such as HTML or a proprietary format.
When setting up your newsletter integration, be prepared to adapt your content and design to the specific requirements of your chosen provider. This may involve customizing the layout, styling, and content of your newsletters to align with the capabilities and guidelines of the provider you are using.
This Community Example may provide more insight on configuring the newsletter client: SendGrid Email Service Provider Connector
Create a Sign-up Page
Create your signup page using one of the following two options:
Option 1: Embedded Sign-Up Form
Many email service providers have an option to copy and embed an HTML form with little to no JavaScript customization required.
Themes customers can use the HTML Box - Arc Block to embed HTML directly on to a page with no additional development work required. To embed your sign up form HTML, add the HTML Box - Arc Block to your page and paste the HTML provided by your email service provider directly into the HTML custom field.
See Themes - Using Additional Blocks for more information on adding embed codes with the HTML Box - Arc Block.
Option 2: API and Custom Form
If your email service provider does not offer embedded HTML forms and uses an API instead, both Themes and non-Themes customers must create a custom block with the form fields and handle the API request yourself. The following example illustrates how to construct a basic form for submitting data to an API. The sample is provided as boilerplate framework and requires you to perform additional development.
import { useState } from 'react'import axios from 'axios';import { NEWSLETTER_URL } from 'fusion:environment';
const NewsletterSignUpForm = () => {  const [email, setEmail] = useState("");
  const handleSubmit = (e) => {    ...    // send request to API    // The request format will depend on your email provider    axios.post(NEWSLETTER_URL,      {        email: email        ... // include other form fields      });  };
return ( <form onSubmit={handleSubmit}> <label> Email <input type="email" name="email" onChange={(e) => setEmail(e.target.value)} /> </label> ... /* Additional input fields, name, address, etc */ ... </form> );};export default NewsletterSignUpForm;Set up a Publication in WebSked
Set up a publication in WebSked dedicated to managing each of your newsletters. Keep in mind that you need to create separate Publications for each of your newsletters.
For each newsletter, create a Publication. For our example, we use a generic “Today’s Newsletter” as our Publication.
You’ll also want to create and designate a group in the system — such as “Newsletter Team” or “Publications Team” — in order to set up your notifications.
Create an IFX integration
Create an IFX integration that pulls the content from your Publication and sends it to your newsletter service provider when the publication edition is finalized. In your IFX integration, ensure that you have set up comprehensive logging. Comprehensive logging lets you check that the data is sent to you email service provider as expected.
Remember, locally you can simulate requests using manually-created payloads which can be found on the event menu through cURL/Postman.
Event Handler
- Your integration should have a handler is ready to receive
websked:edition_finalizeevents
Handler Logic
The integration should check to see if the publication matches the criteria for when it should be sent. For example:
- The publication should match an existing email list
- The story’s primary website (associated with the publication) should not be different from the website for this Email List
- If the content satisfies the requirements, continue
The payload only includes basic information about the task. Based on the storyIds sent in the event payload, your integration calls Content API and pulls the proper objects to form the complete package.
Finally, the integration transforms the content into the proper format, which is generally HTML, and delivers that package into a template in the newsletter client. Something to note is IFX does not handle the styling for the email, but there are resources and modules that could possibly be used.
At this point, your newsletter client should have received the content payload from your IFX integration. It can then use this data to create a draft of an e-mail and, when you’re ready, send out the appropriate newsletter content to your readership.
Test the End-to-End Integration
The following steps outline the end-to-end testing process for the newsletter integration. You may need to make adjustments based on specific platform configurations and workflows.
-
Implement Sign-up Block:
- Place the new sign-up block on a dedicated page of your website in a non-production environment (for example, Sandbox or Development)
-
Validate Form Display:
- Navigate to the sign-up page and ensure the form appears correctly
-
Submit Form and Validate Email Addition:
- Complete the form with a valid email address and submit it
- Verify that the email address has been added to your email service provider’s system
- Use an email address you can access to confirm receipt of the verification email
-
Pitch Content to WebSked Publication:
- Pitch relevant content to the designated WebSked Publication for the newsletter
- Refer to How To Pitch Content in Arc XP for detailed instructions
-
Accept Pitches in WebSked:
- Within WebSked, accept at least one pitch for the Publication
-
Organize Accepted Pitches:
- Place the accepted pitches into the appropriate Edition of the Newsletter
-
Finalize Publication Edition:
- Finalize the edition within WebSked, triggering the
websked:edition_finalizeevent in IFX
- Finalize the edition within WebSked, triggering the
-
Trigger IFX Integration:
- The IFX integration subscribed to
websked:edition_finalizeis deployed and promoted - The integration retrieves necessary data from the Content API based on the story IDs sent in the payload for the
websked:edition_finalizeevent
- The IFX integration subscribed to
-
Send Newsletter to Subscribers:
- The email service provider receives all content for the Edition and distributes it to subscribers of the Newsletter, including the test email provided in step 3
-
Confirm Receipt:
- Check the test email address from step 3 to ensure receipt of the Newsletter in the inbox