Implement registration, login and one-time-access link
Prerequisites
- Initialize the Arc XP Identity SDK package
- Obtain the configuration for the tenant. A successful sign-up depends on whether the password meets the minimum requirements defined in the subscription settings. Additionally, registration, login, and one-time access flows may be protected with reCAPTCHA. Therefore, it is necessary to retrieve the configuration to understand the setup for the tenant (organization and site). Thus, you can add additional validation to the password fields, and show/hide the reCaptcha component based on the settings.
import Identity from '@arc-publishing/sdk-identity';...const [siteConfigs, setSiteConfigs] = useState();useEffect(()=>{ const getSiteConfigs = async () => { try { await Identity.getConfig().then(config => { setSiteConfigs(config); }); } catch (e) { alert(e.message); } }; getSiteConfigs();},[]);Registration
Arc XP Identity provides full ability for users to create an account by providing basic user information: username, email address, and password.
A user account can be created in one of the following ways:
- Email and Password: User provides basic credentials: email or username and credentials (password)
- Social authentication providers: Facebook, Google, Apple and OIDC login methods are available. For more details on that setup, and implementation, please check Configure third-party authentication providers: Facebook, Google, Apple, and OIDC and Implement Social Sign In.
This document will guide you through regular login (email+password).
Before setting up your Identity forms, you must determine how you want to configure your usernames. The available options are global.
- UsernameIsEmail set to TRUE configures Identity so Profile.identities.username is updated when Profile.Email changes. These two profile values are kept in sync and users are not able to have a separate username from their email.
- UsernameIsEmail set to FALSE allows users to set a username for their login. The username can be their email or a username of their choice.
User accounts are global and a pool across all sites. Check with the Subscriptions team to know what is the setting your org has.
-
Create the registration form
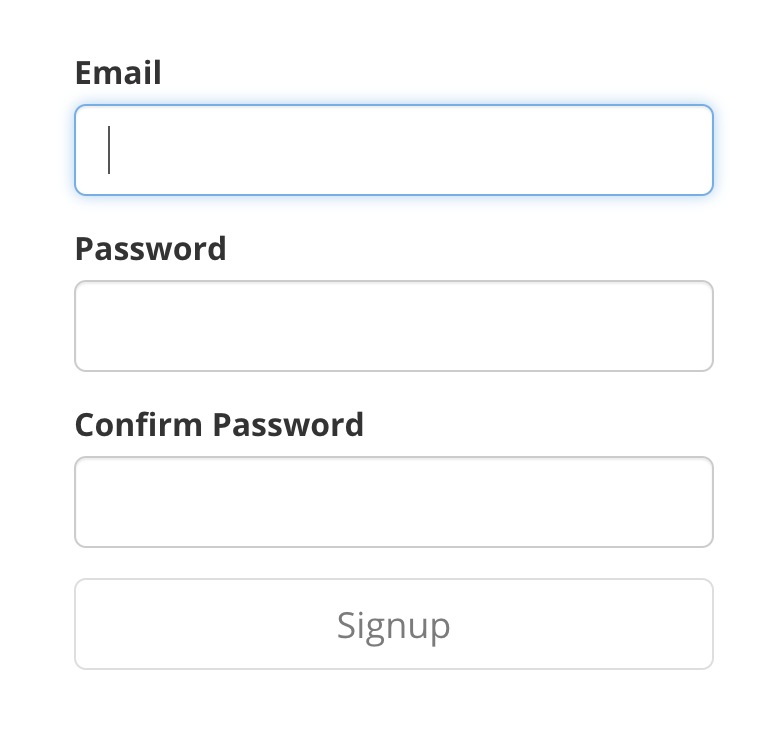
The Signup form should have at least two input fields for email and password, and a button to send the form. Below is an example of a Signup form.
Recomendations
- Make sure the user meets the minumum password requirements before send the form. You will need to check pwMinLength, pwSpecialCharacters, pwLowercase, pwUppercase, pwNumbers values returned from
Identity.getConfig() - Enforce the client to enter the password two times.
- Make sure you are showing handling/displaying errors in case sometime went wrong during the Signup request.
This form can request additional user information such as firstName, lastName, second last name, date of birth, phone number, additional attributes.
- Make sure the user meets the minumum password requirements before send the form. You will need to check pwMinLength, pwSpecialCharacters, pwLowercase, pwUppercase, pwNumbers values returned from
-
Display or hide reCAPTCHA based on the tenant settings
Your site can be protected by reCAPCTHA. You will need to show or hide the reCAPTCHA component (v2 o v3) based on the settings you have defined on the Admin for your site.
recaptchaScore, recaptchaSiteKey, and signupRecaptcha returned from
Identity.getConfig()are used to implement reCAPCTHA in your site.- If signupRecaptcha is true, that means reCAPTCHA is enabled for Registration.
- If signinRecaptcha is true, that means reCAPTCHA is enabled for Login.
- If magicLinkRecaptcha is true, that means reCAPTCHA is enabled for One-time-access link.
- If recaptchaScore is -1, reCAPTCHA V2 is enabled, else if recaptchaScore has a value between 0 and 1, reCAPTCHA V3 is enabled.
Hook returning the current settings.
import { useState, useEffect } from 'react';import Identity from "@arc-publishing/sdk-identity";const useRecaptcha = () => {const [recaptchaVersion, setRecaptchaVersion] = useState(null);const [recaptchaSiteKey, setRecaptchaSiteKey] = useState(null);const [reCaptchaLogin, setRecaptchaLogin] = useState(false);const [reCaptchaSignUp, setRecaptchaSignUp] = useState(false);const [reCaptchaMagicLink, setRecaptchaMagicLink] = useState(false);useEffect(() => {Identity.getConfig().then(config => {if (config?.recaptchaScore === '-1') {setRecaptchaVersion('V2');}if (0 <= parseFloat(config?.recaptchaScore) && parseFloat(config?.recaptchaScore) <= 1) {setRecaptchaVersion('V3');}setRecaptchaSiteKey(config?.recaptchaSiteKey);setRecaptchaLogin(config?.signinRecaptcha);setRecaptchaSignUp(config?.signupRecaptcha);setRecaptchaMagicLink(config?.magicLinkRecaptcha);});}, []);return {recaptchaVersion,recaptchaSiteKey,reCaptchaLogin,reCaptchaSignUp,reCaptchaMagicLink};};export default useRecaptcha;Display reCAPTCHA V2 or V3 based on the settings returned by the useRecaptcha hook.
import React, { useState, useEffect, useCallback } from 'react';import { ReCaptcha } from 'react-recaptcha-google';import { useGoogleReCaptcha } from 'react-google-recaptcha-v3';import useRecaptcha from '../hooks/useRecaptcha';...export const Register = () => {...const [email, setEmail] = useState('');const [captchaToken, setCaptchaToken] = useState();const { recaptchaVersion, reCaptchaSignUp, recaptchaSiteKey } = useRecaptcha();let captchaRef;const { executeRecaptcha } = useGoogleReCaptcha();const handleReCaptcha3Verify = useCallback(async () => {if (!executeRecaptcha) {console.log('reCAPTCHA execution is not yet available.');return;}const token = await executeRecaptcha();setCaptchaToken(token);}, [executeRecaptcha]);useEffect(() => {if (recaptchaVersion === 'V3' && reCaptchaSignUp) {handleReCaptcha3Verify();}}, [recaptchaVersion, reCaptchaSignUp, executeRecaptcha]);const onLoadRecaptcha = () => {if (captchaRef) {captchaRef.reset();}};if (recaptchaVersion === 'V2' && reCaptchaSignUp) {onLoadRecaptcha();}const verifyCallback = token => {setCaptchaToken(token);};return (<main><section><h1>Sign up!</h1><formonSubmit={e => {e.preventDefault();return Identity.signUp({userName: email,credentials: password},{email},undefined,true,captchaToken).then(() => {//Go to the profile page or the page where you want the user to land after a successful Sign up.}).catch(e){// Grab the error to provide on the page something went wrong};}}><inputplaceholder="Email"type="email"id="email"className="input"value={email}onChange={e => setEmail(e.target.value)}/>...{reCaptchaSignUp && recaptchaVersion === 'V2' && (<ReCaptcharef={el => {captchaRef = el;}}size="normal"render="explicit"sitekey={recaptchaSiteKey}onloadCallback={onLoadRecaptcha}verifyCallback={verifyCallback}/>)}<button type="submit">Sign Up</button></form></section></main>);} -
Call Identity.SignUp() method
As part of the code provided above you can see Identity.SignUp() is called, and the values on the form (including the reCAPTCHA token) are sent as part of the request.
Login
A user can ask for Login in two different ways:
- Email and Password: User provides basic credentials: email or username and credentials (password)
- Social authentication providers: Facebook, Google, Apple and OIDC login methods are available. For more details on that setup, and implementation, please check Configure third-party authentication providers: Facebook, Google, Apple, and OIDC and Implement Social Sign In.
-
Create the Login form
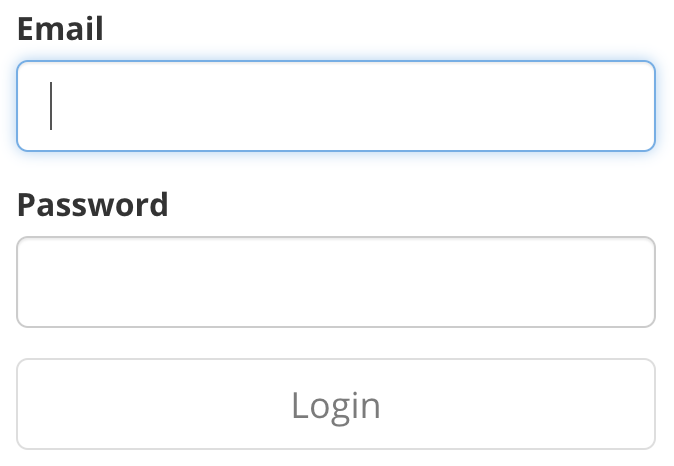
The Login form should have two input fields for email (or username) and password, and a button to send the form. Below is an example of a Login form.
Recomendations
- Make sure you are showing handling/displaying errors in case sometime went wrong during the Login request.
-
Display or hide reCAPTCHA based on the tenant settings
The logic for this page is the same as described for Registration. However, to determine if reCAPTCHA is enabled for login, you will need to check the reCaptchaLogin value returned by the
useRecaptchahook. -
Call Identity.Login() method
...onSubmit={e => {e.preventDefault();return Identity.login(username, password, {true,recaptchaToken: captchaToken}).then(async () => {//Go to the profile page or the page where you want the user to land after a successful login.}).catch(error => {// Grab the error to provide on the page something went wrong});}}
One-time-access link
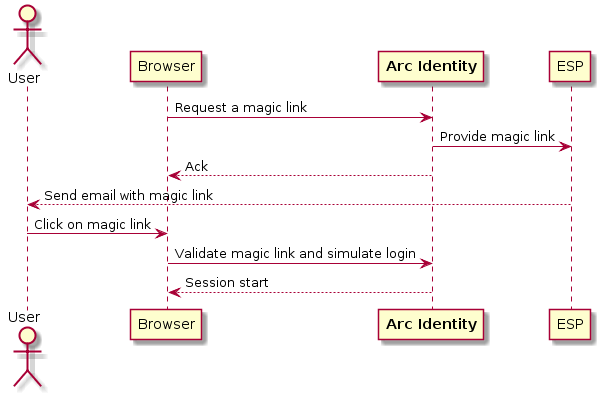
Sometimes, users can’t recall their password (or don’t have access to their password keeper) but want to log in without going through the password reset process. Passwordless authentication allows users to authenticate without the need to login with a password. With this form of authentication, users are presented with the option of logging in simply via a one-time-access link (previously called magiclink), which uses a nonce (i.e. token) delivered via email. To authenticate, the user clicks the link with the embedded nonce granting them a user session.
The nonce can be used a single time and expires after 24 hours. Once the user is granted a session, the refresh-token will be valid for 24 hours.
-
Create the One-time-access link form
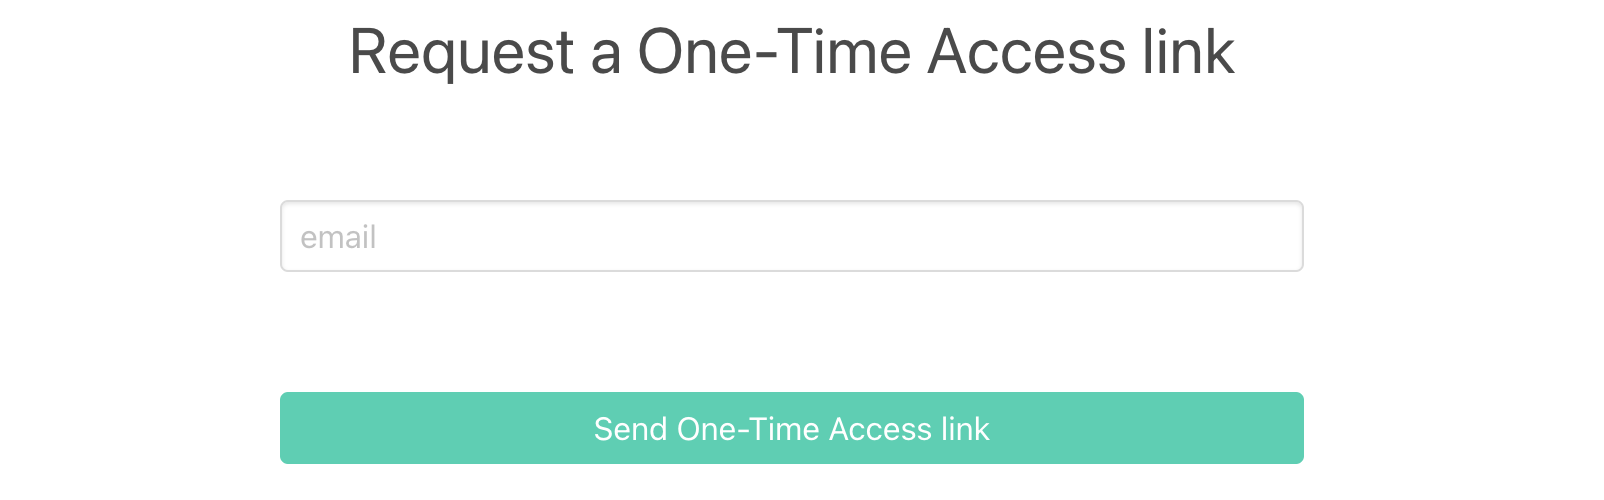
The one-time-access link form should have an input field for email, and a button to send the form. Below is an example of a one-time-access link form.
-
Display or hide reCAPTCHA based on the tenant settings
The logic for this page is the same as described for Registration. However, to determine if reCAPTCHA is enabled for requesting one-time-access link, you will need to check the magicLinkRecaptcha value returned by the
useRecaptchahook. -
Call Identity.requestOTALink() method
onSubmit={e => {e.preventDefault();return Identity.requestOTALink(email, captchaToken).then(() => {// Provide a message indicating to the user a email was sent to their email}).catch(error => {// Grab the error to provide on the page something went wrong});}}Once the user clicks on Send One-Time-Access link, and if the request is successful, you will need to notify the user that an email containing a link has been sent to their email address.
Only if the email exists in Arc XP Identity, a Web Socket event named _MAGIC_LINK_SEND_ is created. The client is on charge to send a link containing the nonce created as part of the web socket event. See How-to listen Web Socket events and Implement IFX email service provider for more details
-
Redeem the nonce
try {await Identity.redeemOTALink(nonce);//Go to the profile page or the page where you want the user to land after a successful login.} catch (e) {setErr(e);}Once the reader clicks on this link, Arc XP identity will validate the nonce by calling Identity.redeemOTALink() and, if successful, log the user in to the site.