
Modern AI coding tools already know how to read your repo, spot patterns, and clone them at warp speed. You can create production-ready Themes blocks with a single request if you have these three things:
- A tool (Cursor with GPT-4 or GitHub Copilot)
- A corpus (your existing block code)
- A clear prompt
This blog will walk through that minimal recipe—no fine-tuning, complex configuration or no custom embeddings, no secret config files. Just your IDE, Out-of-the-box Themes block code, and a well-crafted prompt. By the end, you’ll spin up new blocks (or layouts, content sources, chains, output types) with ease.
Before getting started, there are a few prerequisites that are necessary to follow along:
- Basic familiarity with Arc Features
- Access to an AI-powered IDE such as GitHub Copilot or Cursor
- A GitHub account to clone the public Arc Themes Blocks repository
1. The Tool
In order to utilize AI models with Themes blocks, you must have access to an IDE that can read your local code. AI Chat tools such as ChatGPT have access to developer docs and are capable of generating quality code, but without having the context of Themes blocks code these tools are unable to effectively generate Arc features.
There are several IDEs that you can use to achieve similar results, such as Cursor AI and Windsurf, but in this blog, I will focus on using GitHub Copilot. For other IDEs, the process is similar but the specifc commands and file configurations may vary slightly.
For the model, I recommend using OpenAI’s ChatGPT (GPT-4 series) instead of Anthropic’s Claude, since ChatGPT has already ingested and indexed our Arc XP developer documentation, giving it deeper, first-party context for more accurate answers.
2. The Corpus
Arc features are designed for optimal performance, front-end customization, and usability within Pagebuilder. But understanding how these Arc-specific pieces of code, from custom hooks to Arc Themes components, come together to create features that work in Pagebuilder can be complicated. The good news? With Arc XP Themes blocks, there are already 77 blocks that incorporate the latest pieces of Arc Functionality. These include layouts, chains, blocks, content sources, and more. Add the Themes Blocks folder to your bundle and your IDE will have enough working examples to generate new features with the required Arc functionality.
To add the blocks to your bundle, you can simply run the following command:
npx degit WPMedia/arc-themes-blocks/blocks#arc-themes-release-version-3.0.0 blocks or you can clone the blocks repo, and copy the blocks folder into your local bundle.
Lastly, you just need to make sure your IDE includes this /blocks folder in the context for your request. In Copilot Chat, type #folder:blocks (or use Attach → Folder and pick /blocks) so the assistant pulls the entire folder into its retrieval window before generating code.
3. The Prompt
The code that is generated by the model is only as good as the prompt it is given. For this reason, an understanding of the different types of Arc features is required.
A few tips to make your prompt as effective as possible:
- Name the new block - makes folder paths obvious
- Make it clear what type of block you’re looking for - “create a new content source, layout, etc.”
- Call out an existing block as a reference - “model it after card-list-block”. This will help Copilot prioritize the most relevant code.
- For front end blocks, explicitly call out how you would like the block to be styled
The Results
To test the viability of using Copilot to generate Arc features, I tested a variety of different block types. Specifically, I tested with blocks, layouts, and content sources in order to get a well rounded view of how well the model can generate code for Arc features. Below are the results of each test, including the prompt used, the resulting code, and any comments on the generated code.
Blocks
Prompt
Create a new block in the blocks folder that displays 3 stories side by side, numbered 1-3, using roman numerals. The block should have the numeral, with the image from the story, the headline (linked to the story), the subheadline, and the author’s name all included beneath the numeral. Create toggles for each of these elements, using the medium-promo-block as an example.
Resulting Code
import React from "react";import PropTypes from "@Arc-fusion/prop-types";import { useContent } from "fusion:content";import { useFusionContext } from "fusion:context";import getProperties from "fusion:properties";import { RESIZER_TOKEN_VERSION } from "fusion:environment";import {  Heading,  Stack,  Grid,  Image,  Link,  LazyLoad,  isServerSide,} from "@wpmedia/Arc-themes-components";
const BLOCK_CLASS_NAME = "b-numbered-stories";
const getFallbackImageURL = ({ deployment, contextPath, fallbackImage }) => {  let targetFallbackImage = fallbackImage;
  if (!targetFallbackImage.includes("http")) {    targetFallbackImage = deployment(`${contextPath}/${targetFallbackImage}`);  }
  return targetFallbackImage;};
const NumberedStoriesWrapper = ({ customFields }) => {  const { ArcSite, contextPath, deployment, isAdmin } = useFusionContext();  const { fallbackImage } = getProperties(ArcSite);
  const targetFallbackImage = getFallbackImageURL({    deployment,    contextPath,    fallbackImage,  });
  if (customFields.lazyLoad && isServerSide() && !isAdmin) {    return null;  }
  return (    <LazyLoad enabled={customFields.lazyLoad && !isAdmin}>      <NumberedStories        customFields={customFields}        targetFallbackImage={targetFallbackImage}        ArcSite={ArcSite}      />    </LazyLoad>  );};
const NumberedStories = ({ customFields, targetFallbackImage, ArcSite }) => {  const {    listContentConfig: { contentService = "", contentConfigValues = {} } = {},    title = "",    showImage = true,    showHeadline = true,    showSubheadline = true,    showAuthor = true,  } = customFields;
  const { content_elements: contentElements = [] } = useContent({    source: contentService,    query: { ...contentConfigValues, feature: "numbered-stories" },    filter: `{      content_elements {        _id        headlines {          basic        }        subheadlines {          basic        }        credits {          by {            name          }        }        promo_items {          basic {            _id            auth {              ${RESIZER_TOKEN_VERSION}            }            focal_point {              x              y            }            type            url            alt_text          }        }        websites {          ${ArcSite} {            website_url          }        }      }    }`,  }) || {};
  if (!contentElements || contentElements.length === 0) {    return null;  }
  const romanNumerals = ["I", "II", "III"];  const stories = contentElements.slice(0, 3);
  return (    <Stack direction="vertical" className={BLOCK_CLASS_NAME}>      {title ? <Heading className={`${BLOCK_CLASS_NAME}__title`}>{title}</Heading> : null}      <Grid className={`${BLOCK_CLASS_NAME}__stories-grid`}>        {stories.map((story, index) => {          const imageUrl = story.promo_items?.basic?.url;          const imageAlt = story.promo_items?.basic?.alt_text || story.headlines.basic;
          return (            <Stack direction="vertical" key={story._id} className={`${BLOCK_CLASS_NAME}__story-item`}>              <div className={`${BLOCK_CLASS_NAME}__number`}>{romanNumerals[index]}</div>              {showImage && (                <Image                  src={imageUrl || targetFallbackImage}                  alt={imageAlt}                  className={`${BLOCK_CLASS_NAME}__image`}                  auth={story.promo_items?.basic?.auth}                  focalPoint={story.promo_items?.basic?.focal_point}                />              )}              {showHeadline && (                <Link                  href={story.websites[ArcSite].website_url}                  className={`${BLOCK_CLASS_NAME}__headline`}                >                  <Heading>{story.headlines.basic}</Heading>                </Link>              )}              {showSubheadline && story.subheadlines?.basic && (                <div className={`${BLOCK_CLASS_NAME}__subheadline`}>{story.subheadlines.basic}</div>              )}              {showAuthor && story.credits?.by?.[0]?.name && (                <div className={`${BLOCK_CLASS_NAME}__author`}>By {story.credits.by[0].name}</div>              )}            </Stack>          );        })}      </Grid>    </Stack>  );};
NumberedStoriesWrapper.propTypes = {  customFields: PropTypes.shape({    listContentConfig: PropTypes.contentConfig("ans-feed").tag({      group: "Configure Content",      label: "Display Content Info",    }),    title: PropTypes.string.tag({      label: "Title",    }),    showImage: PropTypes.bool.tag({      label: "Show image",      defaultValue: true,      group: "Show promo elements",    }),    showHeadline: PropTypes.bool.tag({      label: "Show headline",      defaultValue: true,      group: "Show promo elements",    }),    showSubheadline: PropTypes.bool.tag({      label: "Show subheadline",      defaultValue: true,      group: "Show promo elements",    }),    showAuthor: PropTypes.bool.tag({      label: "Show author",      defaultValue: true,      group: "Show promo elements",    }),    lazyLoad: PropTypes.bool.tag({      name: "Lazy Load block?",      defaultValue: false,      description:        "Turning on lazy-loading will prevent this block from being loaded on the page until it is nearly in-view for the user.",    }),  }),};
NumberedStoriesWrapper.label = "Numbered Stories";
NumberedStoriesWrapper.icon = "Arc-numbered-stories";
export default NumberedStoriesWrapper;{ "numbered-stories": { "styles": { "default": { "margin": "$global.spacing-4 0" } } }, "numbered-stories-grid": { "styles": { "default": { "display": "grid", "grid-template-columns": "repeat(3, 1fr)", "gap": "$global.spacing-4" } } }, "numbered-stories-item": { "styles": { "default": { "position": "relative", "padding": "$global.spacing-4" } } }, "numbered-stories-number": { "styles": { "default": { "font-family": "$alias.font-family-primary", "font-size": "$global.font-size-8", "font-weight": "$global.font-weight-bold", "color": "$global.neutral-4", "margin-bottom": "$global.spacing-2" } } }, "numbered-stories-image": { "styles": { "default": { "width": "100%", "aspect-ratio": "16/9", "object-fit": "cover", "margin-bottom": "$global.spacing-3" } } }, "numbered-stories-headline": { "styles": { "default": { "color": "$global.neutral-4", "text-decoration": "none", "margin-bottom": "$global.spacing-2", "font-family": "$alias.font-family-primary", "font-size": "$global.font-size-4", "font-weight": "$global.font-weight-bold", "line-height": "$global.line-height-tight" } } }, "numbered-stories-subheadline": { "styles": { "default": { "color": "$global.neutral-3", "font-family": "$alias.font-family-secondary", "font-size": "$global.font-size-3", "line-height": "$global.line-height-normal", "margin-bottom": "$global.spacing-2" } } }, "numbered-stories-author": { "styles": { "default": { "color": "$global.neutral-3", "font-family": "$alias.font-family-secondary", "font-size": "$global.font-size-2", "line-height": "$global.line-height-normal" } } }}@use "@wpmedia/Arc-themes-components/scss";
.b-numbered-stories { @include scss.block-components("numbered-stories"); @include scss.block-properties("numbered-stories");
&__stories-grid { @include scss.block-components("numbered-stories-grid"); @include scss.block-properties("numbered-stories-grid"); }
&__story-item { @include scss.block-components("numbered-stories-item"); @include scss.block-properties("numbered-stories-item"); }
&__number { @include scss.block-components("numbered-stories-number"); @include scss.block-properties("numbered-stories-number"); }
&__image { @include scss.block-components("numbered-stories-image"); @include scss.block-properties("numbered-stories-image"); }
&__headline { @include scss.block-components("numbered-stories-headline"); @include scss.block-properties("numbered-stories-headline"); }
&__subheadline { @include scss.block-components("numbered-stories-subheadline"); @include scss.block-properties("numbered-stories-subheadline"); }
&__author { @include scss.block-components("numbered-stories-author"); @include scss.block-properties("numbered-stories-author"); }}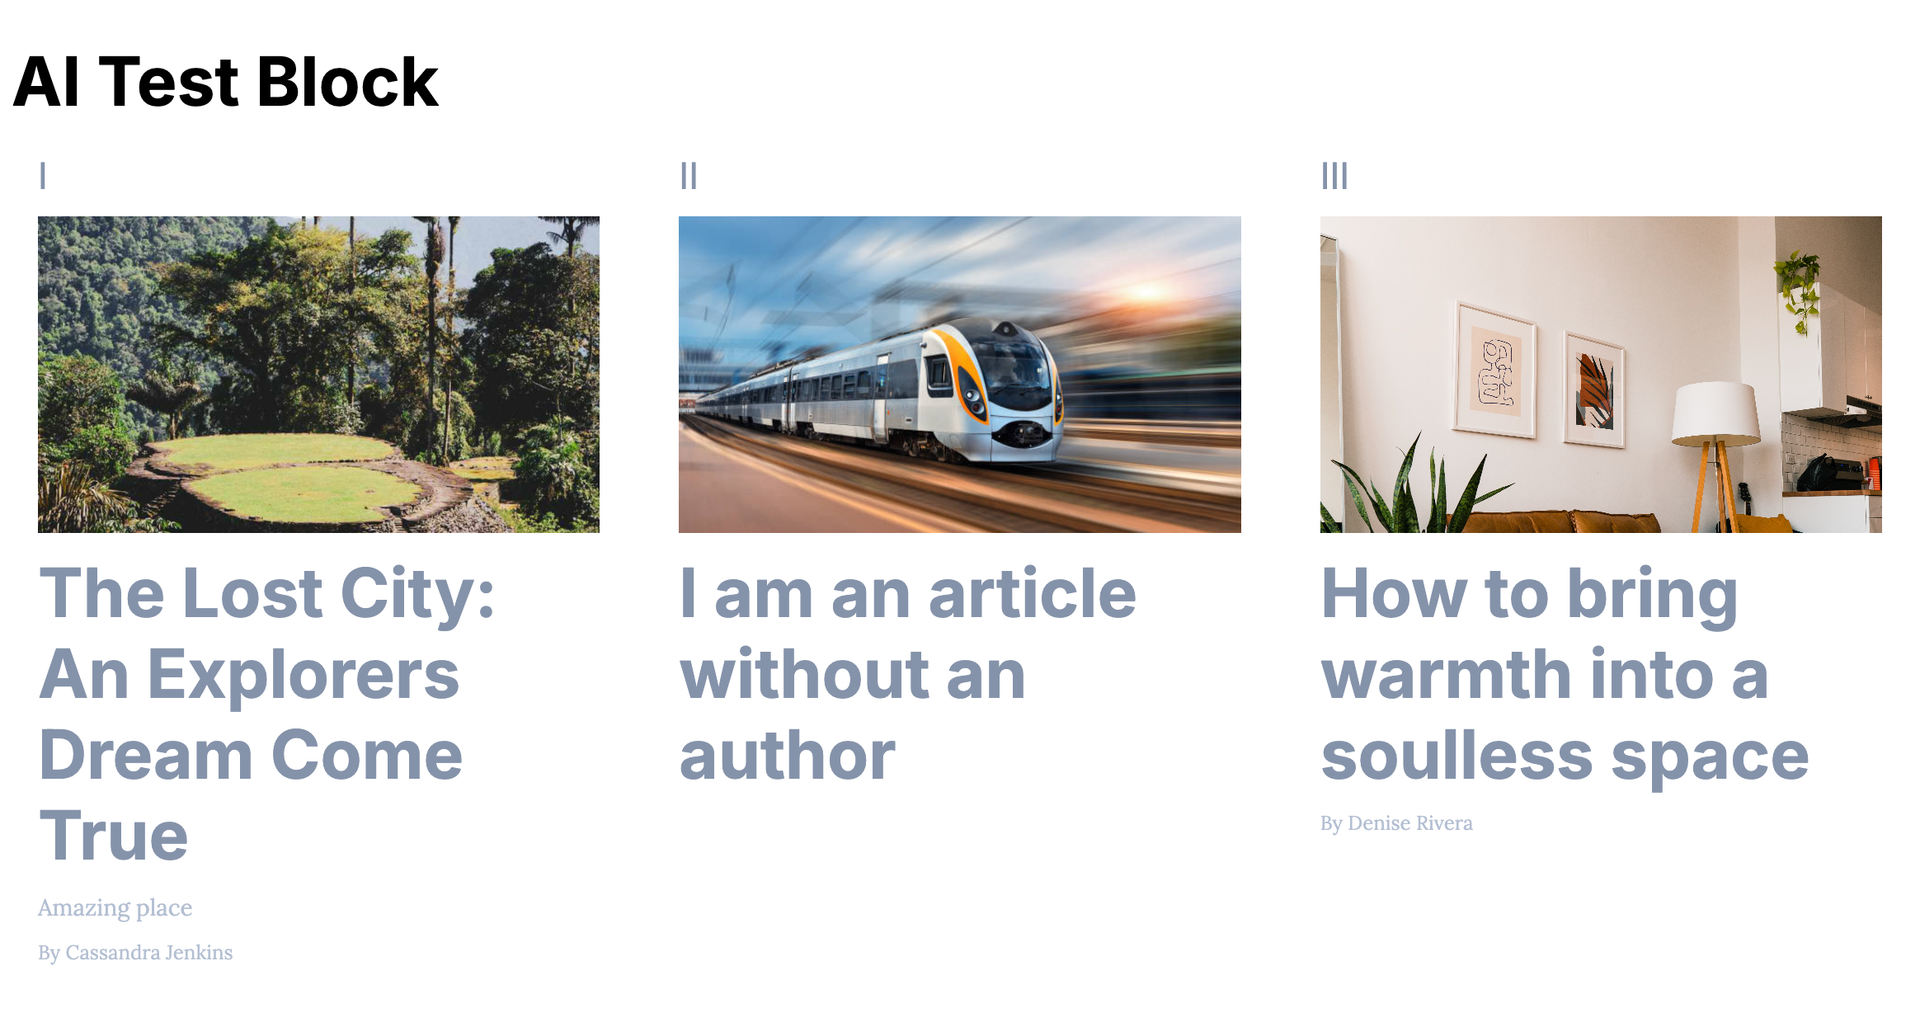
Comments
The generated block included all of the functionality specified in the prompt and worked correctly. The styles would need some tweaks since the roman numerals were very small, but the implementation of the styles correctly followed the Themes styling format so this would be an easy change.
Layouts
Prompt
Using the the right-rail-block as an example, generate a new layout block with a label “Multiple Section Layout”, and the following sections in order:
navigation: which extends the full width
header: which extends the full width
triple-column: which has 3 columns of equal width
left rail: with the same styles as the right rail, but flipped
main: with the same styles as the right rail block
footer: which extends the full width.
Make sure the layout is responsive and uses the Themes folder for styling
Follow the same file structure as the right-rail-layout-block. It should have a Themes folder with a news.json file that contains the styles
Resulting Code
import React from "react";import PropTypes from "prop-types";import { Grid, Stack } from "@wpmedia/Arc-themes-components";
const LAYOUT_CLASS_NAME = "b-multiple-section-layout";
const MultipleSectionLayout = ({ children }) => {  // Order: navigation, header, triple-column, left rail, main, footer  const [navigation, header, tripleColumn, leftRail, main, footer] = React.Children.toArray(children);
  return (    <div className={LAYOUT_CLASS_NAME}>      {navigation && (        <Stack as="nav" className={`${LAYOUT_CLASS_NAME}__full-width`}>          {navigation}        </Stack>      )}      {header && (        <Stack as="header" className={`${LAYOUT_CLASS_NAME}__header`}>          {header}        </Stack>      )}      {tripleColumn && (        <Grid className={`${LAYOUT_CLASS_NAME}__three-column`} columns={3}>          {tripleColumn}        </Grid>      )}      <Grid className={`${LAYOUT_CLASS_NAME}__content`} columns={4}>        {leftRail && (          <Stack as="aside" className={`${LAYOUT_CLASS_NAME}__left-rail`}>            {leftRail}          </Stack>        )}        {main && (          <Stack as="main" className={`${LAYOUT_CLASS_NAME}__main`}>            {main}          </Stack>        )}      </Grid>      {footer && (        <Stack as="footer" className={`${LAYOUT_CLASS_NAME}__footer`}>          {footer}        </Stack>      )}    </div>  );};
MultipleSectionLayout.propTypes = {  children: PropTypes.array,};
MultipleSectionLayout.sections = [  "navigation",  "header",  "triple-column",  "left-rail",  "main",  "footer",];
MultipleSectionLayout.label = "Multiple Section Layout";
export default MultipleSectionLayout;{ "multiple-section-navigation": { "styles": { "default": { "position": "sticky", "inset-block-start": 0, "inline-size": "100%", "z-index": 9, "margin-block-start": "0", "margin-inline-end": "0", "margin-block-end": "var(--global-spacing-5)", "margin-inline-start": "0" }, "desktop": { "padding-block-start": "0", "padding-inline-end": "0", "padding-block-end": "var(--global-spacing-8)", "padding-inline-start": "0" } } }, "multiple-section-header": { "styles": { "default": { "inline-size": "100%", "padding": "var(--global-spacing-5)", "border": "2px solid var(--color-brand-primary)", "background-color": "var(--color-background-primary)" } } }, "multiple-section-three-column": { "styles": { "default": { "margin-block": "var(--global-spacing-5)", "margin-inline": "auto", "max-inline-size": "75rem", "padding": "var(--global-spacing-5)", "border": "2px solid var(--color-brand-secondary)", "background-color": "var(--color-background-primary)" } } }, "multiple-section-content": { "styles": { "default": { "margin-block": "var(--global-spacing-5)", "margin-inline": "auto", "max-inline-size": "75rem", "background-color": "var(--color-background-primary)" } } }, "multiple-section-left-rail": { "styles": { "default": { "grid-column": "1", "padding": "var(--global-spacing-5)", "border": "2px solid var(--color-brand-tertiary)", "background-color": "var(--color-background-primary)" }, "desktop": { "border-inline-end-width": "1px", "border-inline-end-style": "solid", "border-inline-end-color": "#dadada", "padding-block-start": "0", "padding-inline-end": "var(--global-spacing-6)", "padding-block-end": "0", "padding-inline-start": "0" } } }, "multiple-section-main": { "styles": { "default": { "grid-column": "2 / span 3", "padding": "var(--global-spacing-5)", "border": "2px solid var(--color-brand-quaternary)", "background-color": "var(--color-background-primary)", "max-inline-size": "calc(var(--content-max-width) * 1px)", "inline-size": "var(--content-scale-width)", "margin-block-start": "auto", "margin-inline-end": "auto", "margin-block-end": "auto", "margin-inline-start": "auto" }, "desktop": { "border-inline-start-style": "solid", "border-inline-start-width": "1px" } } }, "multiple-section-footer": { "styles": { "default": { "inline-size": "100%", "padding": "var(--global-spacing-5)", "border": "2px solid var(--color-brand-quinary)", "background-color": "var(--color-background-primary)" } } }}@use "@wpmedia/Arc-themes-components/scss";
.b-multiple-section-layout { &__navigation { @include scss.block-properties("multiple-section-navigation"); @include scss.block-components("multiple-section-navigation"); }
&__header { @include scss.block-properties("multiple-section-header"); @include scss.block-components("multiple-section-header"); }
&__three-column { @include scss.block-properties("multiple-section-three-column"); @include scss.block-components("multiple-section-three-column"); }
&__content { @include scss.block-properties("multiple-section-content"); @include scss.block-components("multiple-section-content"); }
&__left-rail { @include scss.block-properties("multiple-section-left-rail"); @include scss.block-components("multiple-section-left-rail"); }
&__main { @include scss.block-properties("multiple-section-main"); @include scss.block-components("multiple-section-main"); }
&__footer { @include scss.block-properties("multiple-section-footer"); @include scss.block-components("multiple-section-footer"); }}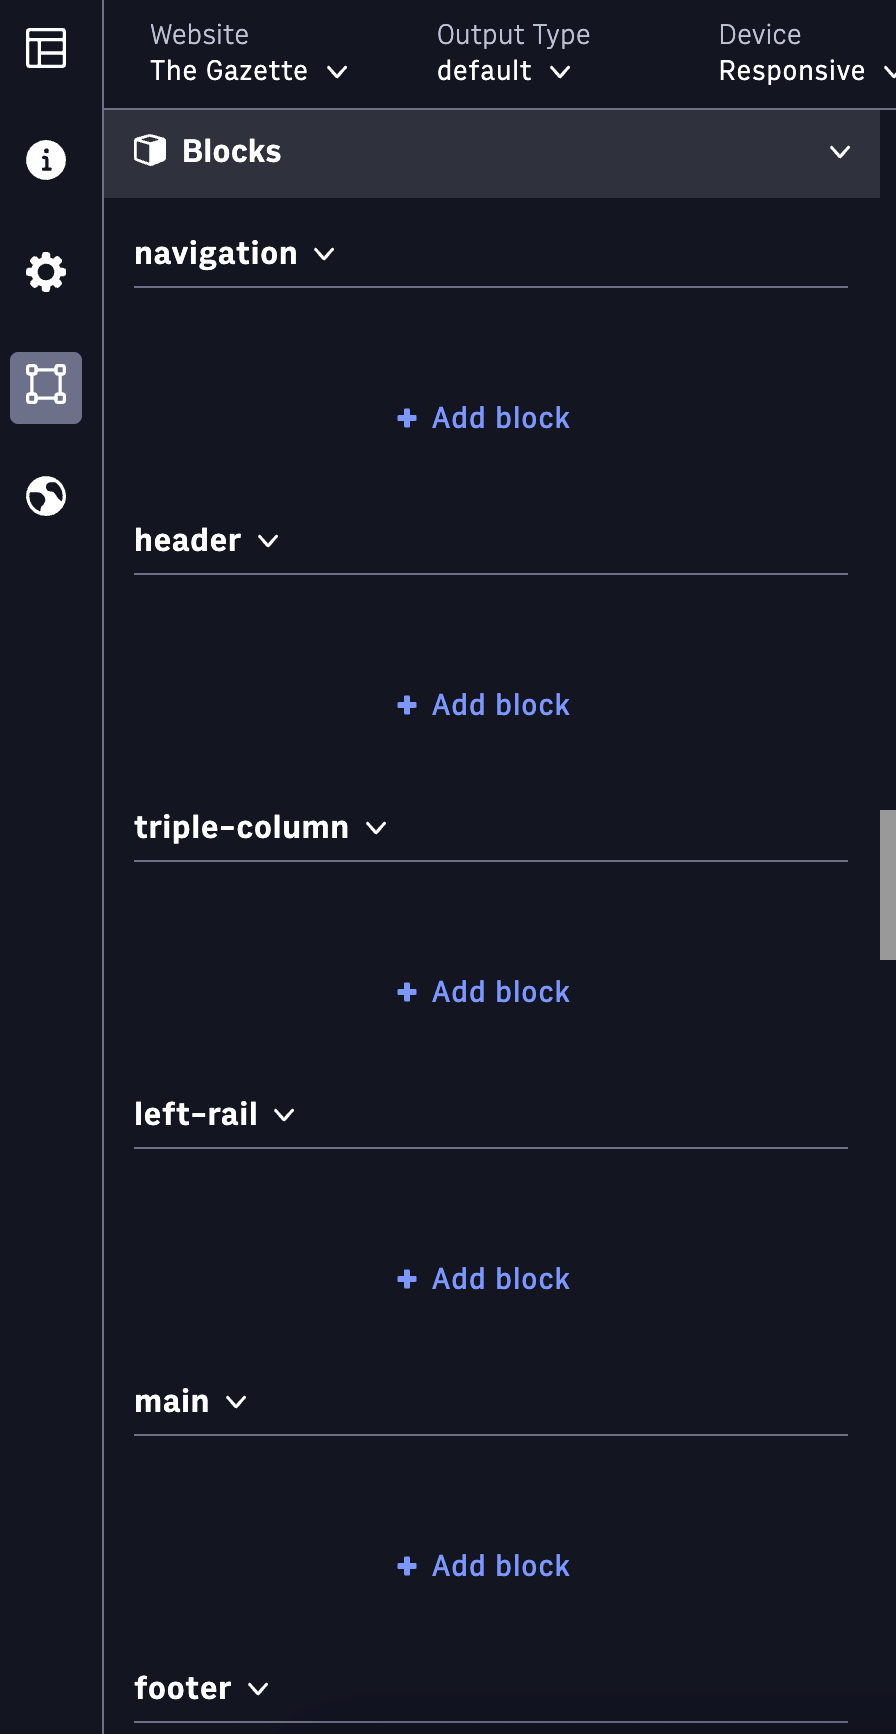
Comments
Despite the fact that layouts are conceptually simple, the fact that there are only 3 Themes layout blocks and they include some Arc-specific syntax, I had to refine my prompt with more specific instructions to get the resulting layout to function correctly, and to get the model to structure the files in the correct structure.
Content Sources
Prompt
Create a content source that allows a user to specify both a section and an author
Resulting Code
import axios from "axios";import { ARC_ACCESS_TOKEN, CONTENT_BASE, RESIZER_TOKEN_VERSION } from "fusion:environment";import signImagesInANSObject from "@wpmedia/Arc-themes-components/src/utils/sign-images-in-ans-object";import handleFetchError from "@wpmedia/Arc-themes-components/src/utils/handle-fetch-error";import { fetch as resizerFetch } from "@wpmedia/signing-service-content-source-block";
/** * @func itemsToArray * @param {String} itemString - a csv list of items to turn into an array * @return {String[]} the itemString now in an array */const itemsToArray = (itemString = "") =>  itemString.split(",").map((item) => item.trim().replace(/"/g, ""));
const params = [  {    displayName: "includeSections",    name: "includeSections",    type: "text",  },  {    displayName: "authorSlug",    name: "authorSlug",    type: "text",  },  {    displayName: "feedOffset",    name: "feedOffset",    type: "number",  },  {    displayName: "feedSize",    name: "feedSize",    type: "number",  },  {    default: "2",    displayName: "Themes Version",    name: "themes",    type: "text",  },];
const fetch = (  {    includeSections,    authorSlug,    feedOffset: from = 0,    feedSize: size = 10,    "Arc-site": website,  },  { cachedCall }) => {  if (!includeSections) {    return Promise.reject(new Error("includeSections parameter is required"));  }  if (!authorSlug) {    return Promise.reject(new Error("authorSlug parameter is required"));  }
  const body = {    query: {      bool: {        must: [          {            term: {              "revision.published": "true",            },          },          {            nested: {              path: "taxonomy.sections",              query: {                bool: {                  must: [                    {                      terms: {                        "taxonomy.sections._id": itemsToArray(includeSections),                      },                    },                    {                      term: {                        "taxonomy.sections._website": website,                      },                    },                  ],                },              },            },          },          {            query_string: {              query: `credits.by.slug:\"${authorSlug}\"`,            },          },        ],      },    },  };
  const urlSeArch = new URLSeArchParams({    body: JSON.stringify(body),    from,    size,    sort: "display_date:desc",    website,  });
  return axios({    url: `${CONTENT_BASE}/content/v4/seArch/published?${urlSeArch.toString()}`,    headers: {      "content-type": "application/json",      Authorization: `Bearer ${ARC_ACCESS_TOKEN}`,    },    method: "GET",  })    .then(signImagesInANSObject(cachedCall, resizerFetch, RESIZER_TOKEN_VERSION))    .then(({ data }) => data)    .catch(handleFetchError);};
export default {  fetch,  params,  schemaName: "ans-feed",};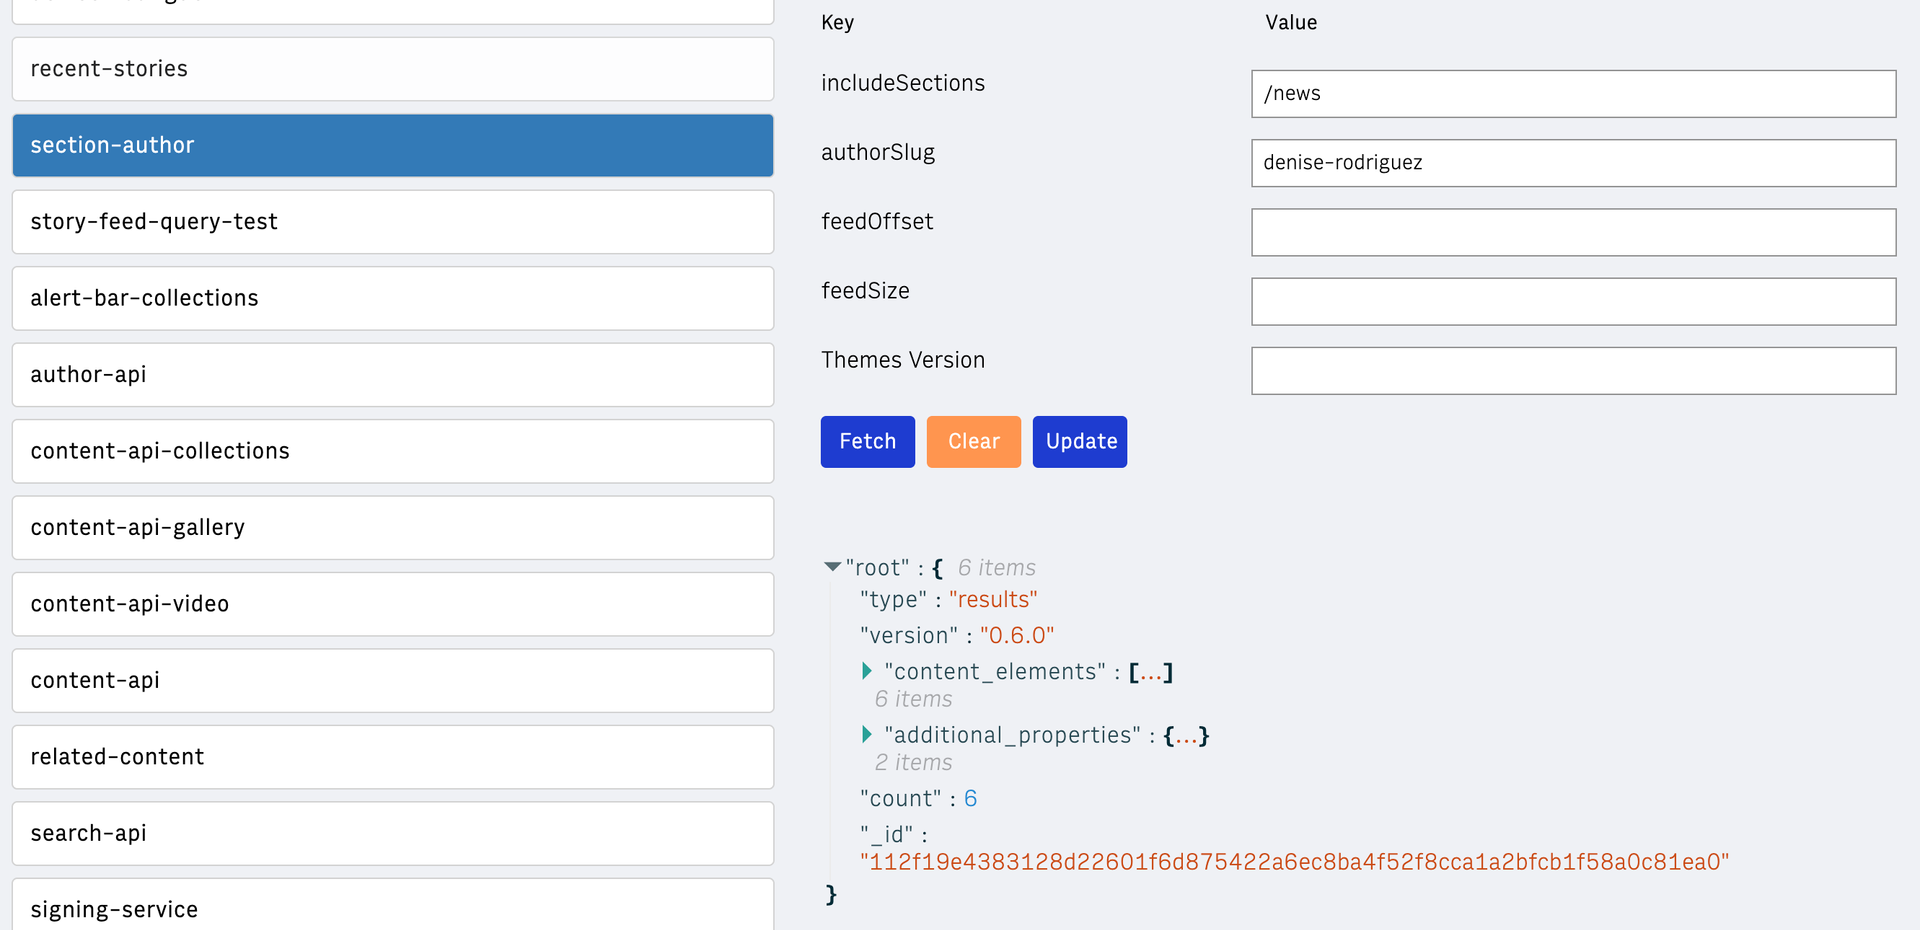
Comments
Despite having an extremely simple prompt, the generated content source worked exactly as expected. There are 11 example content sources, all of which have the same basic elements and structure, which allows the AI models to do a great job generating the code.
Optimize Results with Custom Instructions
The prompts listed above were run with no additional setup, but there were a few pitfalls that I encountered during testing. For example, the model would sometimes generate the wrong kind of block (i.e. a front-end block instead of a content source), or it would generate the code with the wrong file structure. Thankfully, GitHub Copilot has a feature called Custom Instructions that allows you to specify how you want the model to behave. This is a great way to improve the quality of the generated code and tailor the output to your organization.
Below is a basic instruction file to provide more clear instructions for the model, to help avoid common mistakes.
To add the instructions file, simply create a new copilot-instructions.md file in the .github folder at the root of your repository (.github/copilot-instructions.md), and paste in the code below. This file can also be modified to include specific style guidelines, naming conventions and Architectural rules for your organization that you’d like for Copilot to consider when generating code.
---description:globs:alwaysApply: true------description: Reference examples for generating blocks, layouts, content sources, chains, and output types. Attach with @block-generation-reference when needed.type: Manual---
## How to useAppend `@block-generation-reference` in your prompt to include these guidelines.
---
### 1. Content Sources - reference these examples
- alert-bar-content-source-block- related-content-content-source-block- content-api-source-block- collections-content-source-block- author-content-source-block- seArch-content-source-block- site-hierArchy-content-block- story-feed-author-content-source-block- story-feed-query-content-source-block- story-feed-sections-content-source-block- story-feed-tag-content-source-block- tags-content-source-block- unpublished-content-source-block- resizer-image-content-source-block
---
### 2. Layouts - reference these examples
- right-rail-block- right-rail-advanced-block- single-column-block
---
### 3. Output Types - reference these examples
When asked to create an output type, use **default-output-block** as the example.
---
### 4. Chains - reference these examples
- header-nav-chain-block- single-chain-block- double-chain-block- triple-chain-block- quad-chain-block
---
### 5. Blocks – general examples
- header-block- headline-block- lead-art-block- subheadline-block- article-body-block- article-tag-block- byline-block- date-block- gallery-block- overline-block- section-title- tag-title-block- video-player-block- card-list-block- numbered-list-block- results-list-block- seArch-results-list-block- simple-list-block- top-table-list-block- extra-large-manual-promo-block- large-manual-promo-block- medium-manual-promo-block- small-manual-promo-block- extra-large-promo-block- large-promo-block- medium-promo-block- small-promo-block- author-bio-block- full-author-bio-block- ads-block- ad-taboola-block- alert-bar-block- links-bar-block- footer-block- masthead-block
---
### 6. Choosing the correct `contentConfig`
| Scenario                     | `contentConfig.type` | Example blocks                                                                                                   || --------------------------- | -------------------- | ---------------------------------------------------------------------------------------------------------------- || Displays **multiple** items | `ans-feed`           | card-list-block, numbered-list-block, results-list-block, seArch-results-list-block, simple-list-block, top-table-list-block || Displays **single** item    | `ans-item`           | extra-large-promo-block, large-promo-block, medium-promo-block, small-promo-block                                  |
Once the file is added and committed, GitHub Copilot will reference it during code generation and chat, as long as the feature is enabled. In VS Code, make sure it’s turned on by adding the following setting to your settings.json:
"github.copilot.chat.codeGeneration.useInstructionFiles": true
To confirm it’s working, open Copilot Chat, run a prompt, and expand the “References” section. You should see your .copilot-instructions.md file listed there.

Give it a try and don’t be afraid to play around. The more you refine your prompts and update your instructions file, the better your results will get. Whether you ‘re building a new layout, content source, or display block, Copilot and Themes Blocks can take you a long way with just a little guidance.